Pages

Showing posts with label coconut. Show all posts

Tuesday, November 12, 2019

More Pumpkin Things

  • How did it get to be nearly Thanksgiving?  I started this post, or at least the initial inspiration for this post, a year ago when it was just a few weeks away from Thanksgiving 2018.  And here we are.  A mere two-ish weeks away from Thanksgiving 2019.
  • So, before everything turns to the Peppermint Things, I am going to sneak in a Pumpkin Thing.  And a Granola Thing, because in the years I've been writing this blog, how have I not shared a granola recipe???  It's so gloriously adaptable.  Make it your way and you have no excuse to skip breakfast.  It's healthy-ish.  Add milk and you've got a lovely cereal.  Add yogurt, a drizzle of honey, and some fruit and you have a Breakfast of Champions.  
  • You can easily half this recipe as I initially made it to take to the neighborhood produce exchange that I never made it to.  Or just keep the amounts as is and gift everyone at your Thanksgiving dinner to a take home treat.

Pumpkin Granola
Makes about 11 cups
Adapted from Nekisia Davis' Olive Oil & Maple Granola

6 cups rolled oats
1 cup pepitas
1 cup sunflower seeds
1 cup sliced almonds
1 1/2 cups unsweetened, shredded coconut
1 1/4 cup maple syrup
1 cup canola oil
1 cups packed dark brown sugar
1 cup pumpkin puree (not pie filling)
1 tbsp pumpkin pie spice
Kosher salt, a generous pinch

Pre-heat oven to 350 degrees.  In a large mixing bowl, add rolled oats, pepitas, sunflower seeds, almonds, and coconut.  Mix well.  Gradually add maple syrup and canola oil.  Mix well to incorporate liquids into dry ingredients.  Once mixed, add brown sugar, pumpkin puree, and pumpkin pie spice (or your own combination of cinnamon, nutmeg, clove, and ginger).  Add salt to taste.

Split granola mixture between two parchment lined cookie sheets and bake on separate racks in oven.  Bake for 50-60 minutes.  Halfway through bake time, be sure to turn granola and rotate cookie sheets.  Remove from oven when granola is golden brown.  Allow to cool completely before storing in airtight containers.  Will last for at least two weeks.


Thursday, March 12, 2015

#tbt Hiccup

Order is once again restored...and here I am.  Remember when I mentioned earlier this year that I knew 2015 was going to start off rough?  Well...I may have underestimated just how rough.  On top of a lot of little things that have just been piling up, I've been fretting over an upcoming surgery (which occurred this past Monday---I'm home, healing, and it was good news).  Of course...I really did bake last week with the next recipe (it was a good distraction for a few hours), I just didn't feel like having to sit down and write about it.

So, again...here I am.  Originally, I thought I may have been mistaken and didn't have any cookbooks from the 1930's.  But I did have a Sunset magazine or two, both containing recipes, and I had even chosen which one I was going to make.  Then...then I was tagged on Instagram (because there are people on there who know my love of vintage cookbooks and happily point out ones they think I may be interested in).  Turns out, it was for a cookbook I actually already have!  And the date was posted!  1934!  Serendipituous!  Right on cue!

My copy came off the bookshelf and after a flip or three through the pages--extremely worn, stained, torn, and battered pages-- I found the recipe for Coconut Ice Box Cookies.  You know the great thing about ice box cookies?  Anyone can make them.  Anyone.  And they'll be good, if not great.  These are also the best cookie to stash a batch in the freezer and when you have friends stopping by, pull it out, slice what you want, bake, and voila!  Cookies!  Buttery, coconut-ty, crispy on the outside, chewy on the inside.


Tuesday, June 5, 2012

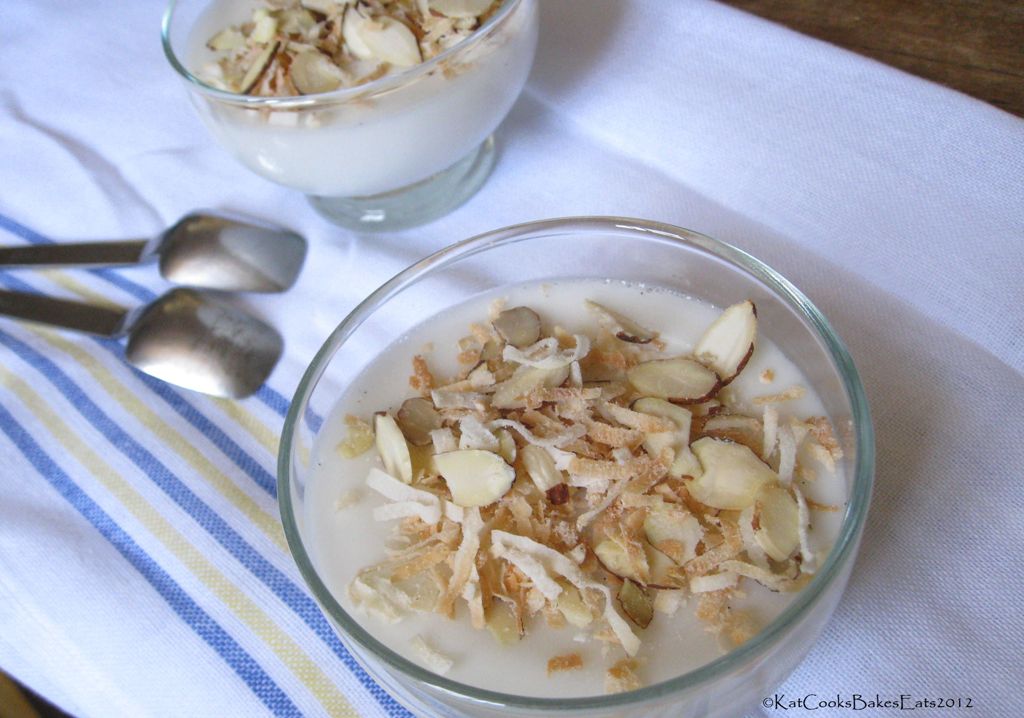
Panna Cotta

Just two Italian words that when spoken, will make you think of sitting at a little trattoria in Rome, sipping an espresso and watching the people around you.  Meaning 'cooked cream,' panna cotta struck me as exotic and difficult to make.  Then I read a recipe and realised that I was wrong.  It's a relatively easy process.  I did a little Googling to see if I could make it with coconut milk.  Lo and behold...you bet you can!

Panna cotta falls into the category of a 'pretty' dessert:  the contrast of white creaminess with whatever you choose to top it with.  I didn't want to compete with the coconut and simply topped it with toasted coconut flakes and slivered almonds.  I used a recipe from the Inspiring the Everyday blog, where Michael's photography makes the dessert look amazing and delectable.  Like Michael, I didn't add any additional flavour, so the panna cotta is very subtle.  Next time I make it with coconut milk, I plan on punching up the flavour a little bit.

Find the recipe on 'Inspiring the Everyday' here.


Wednesday, February 22, 2012

Put the Lime in the Coconut

...and drink it all up.  Or so the song goes.  I didn't put the lime in the coconut, but I did put in on top.  I've had coconut and lime on the brain lately.  Originally, I was planning on baking coconut-lime cupcakes topped with vanilla buttercream and flaked coconut.  Then I thought maybe a drop cookie, but neither panned out.  I was still thinking about those flavours and started thinking about a cake.  I really like single layer cakes.  They're not overwhelming like a layer cake, for making or eating.  With a layer cake, you're obligated to make it a spectacle.  On the other hand, you bake a single layer and plate it.  Sure you can frost it, but there's no shame in simply dusting it with powdered sugar, or even a slip of a glaze.  This cake, though, got special treatment.

Before Christmas I bought a package of ladyfingers (savoiardi, if you speak Italian), that I had yet to open.   The cake was just the reason to open them.  Good thing I waited too, they are so good that they probably wouldn't have lasted this long if I had tried them over the holidays.  The cookies turned into a crumb topping for the cake, generously laced with lime zest.  The cake itself was a basic yellow cake recipe from King Arthur Flour, with a few additions and subtractions along the way.

You might think it would be a tropical cake, but it's not.  I used organic, unsweetened, finely shredded coconut in the cake batter.  With almost a cup of sugar in the recipe itself, the cake didn't need more sweetening (though I did glaze the top of the cake before adding the crumb topping).  The shredded coconut lends a subtle crunch to the cake, which was perfect with coffee, and would no doubt be great with tea.

Coconut Cake with Lime Crumb Topping
Makes one 9-inch round cake
(adapted from King Arthur Flour's Classic Yellow Cake recipe)


Cake:


6 tablespoons butter, room temperature
3/4 cup sugar
1/4 teaspoon salt
1 1/4 teaspoons baking powder
1/2 teaspoon vanilla extract
2 large eggs, plus 1 yolk
1 1/2 cups all-purpose flour
3/4 cup milk
1 cup unsweetened, finely shredded coconut


Glaze:


1/4 cup confectioners' sugar
2 tablespoons milk


Topping:


8 ladyfingers
4 tablespoons butter, room temperature
2 tablespoons lime zest


Pre-heat oven to 350 degrees.  Lightly grease 9-inch round cake pan and line bottom with greased parchment.  In a mixing bowl, cream butter, sugar, salt, baking powder, and vanilla until light and fluffy.  Add eggs one at a time until mixed in, then add extra yolk.  Fold in flour gradually, alternating with milk, until incorporated.  Add coconut and mix well.  Pour batter into pan and bake until toothpick inserted in center comes out clean, about 25-30 minutes.  Cool in pan for 10 minutes, then remove.


While oven is still warm, put zest in to warm and slightly dry it.  Make glaze by whisking the powdered sugar and milk.  Crumble ladyfingers in bowl and cut in butter with pastry cutter.  Add zest and work ingredients together until you have a crumbly mix.  Brush glaze on top of cake and sprinkle crumb topping in a thin layer.  Drizzle more glaze on top of crumb, then add more topping.


You know you want to sing along...