Pages

Tuesday, February 18, 2020

In Season

I hope you know by now that winter in California is my favorite season.  Not necessarily because of the weather-though I do love the years of rainy winters-but because winter is the height of citrus season.  Give me all the Meyer lemons, Eurekas, limes, blood oranges, Cara Caras, kumquats, Satsumas, and Navels!

Do you have a tree that prolifically produces citrus?  Don't know what to do with the overabundance?  Well, I'm your girl!  I will happily take the overflow off your hands.  What will I do with it?  I'll tell you.  I'll make curd, marmalade, have fresh-squeezed orange juice for breakfast, and bake a cake.  Or two.  Or three. 

A cake recipe that I come back to repeatedly is the yogurt cake.  I first came upon it while reading 'On Rue Tatin' by Susan Hermann Loomis.  It is my favorite kind of recipe.  One or two bowls, mixing with nary a hand mixer or Kitchen Aid in sight, pour batter into a pan, bake.  A yogurt cake is also the kind of cake that tastes better the next day, is totally appropriate to have for breakfast, and gives you the best reason to take tea time in the afternoon. 

Don't believe me?  Grab some of that winter citrus and try it.


Orange Yogurt Cake 
Makes one 9 inch loaf

For cake batter:

1 1/2 cups all-purpose flour
2 tsp baking powder 
1/2 tsp salt
1 cup plain yogurt
3/4 cup sugar
3 eggs
2 tsp orange zest
1/2 tsp vanilla extract 
1/2 cup canola oil

For glaze:

1/3 cup orange or tangerine juice
1/3 sugar

Pre-heat oven to 350°.  Line a loaf pan with parchment, leaving a bit of an overhang to easily remove cake from pan.  Grease short ends of pan.  Whisk flour, baking powder, and salt in a mixing bowl.  In a larger bowl, add eggs, sugar, oil, and orange zest.  Whisk until incorporated.  Add extract and yogurt, making sure all ingredients are mixed well.  Add dry ingredients to wet and mix.  Pour batter into loaf pan.  

Bake for 50-60 minutes until a toothpick inserted in center comes out clean.  While cake is baking, make a simple syrup with the 1/3 cup orange or tangerine juice and 1/3 cup sugar.  Heat over medium flame until sugar melts.  Remove from heat and allow to cool. 

When cake is done, allow to cool for at least 10 minutes before removing from pan.  Place cake on a cooling rack over a cookie sheet.  Poke a few holes into the top of the cake, then pour syrup over cake.  Allow syrup to seep into cake. 

Sprinkle with confectioners sugar and serve.  You can make candied peel and garnish with that also.  


Tuesday, November 12, 2019

More Pumpkin Things

  • How did it get to be nearly Thanksgiving?  I started this post, or at least the initial inspiration for this post, a year ago when it was just a few weeks away from Thanksgiving 2018.  And here we are.  A mere two-ish weeks away from Thanksgiving 2019.
  • So, before everything turns to the Peppermint Things, I am going to sneak in a Pumpkin Thing.  And a Granola Thing, because in the years I've been writing this blog, how have I not shared a granola recipe???  It's so gloriously adaptable.  Make it your way and you have no excuse to skip breakfast.  It's healthy-ish.  Add milk and you've got a lovely cereal.  Add yogurt, a drizzle of honey, and some fruit and you have a Breakfast of Champions.  
  • You can easily half this recipe as I initially made it to take to the neighborhood produce exchange that I never made it to.  Or just keep the amounts as is and gift everyone at your Thanksgiving dinner to a take home treat.

Pumpkin Granola
Makes about 11 cups
Adapted from Nekisia Davis' Olive Oil & Maple Granola

6 cups rolled oats
1 cup pepitas
1 cup sunflower seeds
1 cup sliced almonds
1 1/2 cups unsweetened, shredded coconut
1 1/4 cup maple syrup
1 cup canola oil
1 cups packed dark brown sugar
1 cup pumpkin puree (not pie filling)
1 tbsp pumpkin pie spice
Kosher salt, a generous pinch

Pre-heat oven to 350 degrees.  In a large mixing bowl, add rolled oats, pepitas, sunflower seeds, almonds, and coconut.  Mix well.  Gradually add maple syrup and canola oil.  Mix well to incorporate liquids into dry ingredients.  Once mixed, add brown sugar, pumpkin puree, and pumpkin pie spice (or your own combination of cinnamon, nutmeg, clove, and ginger).  Add salt to taste.

Split granola mixture between two parchment lined cookie sheets and bake on separate racks in oven.  Bake for 50-60 minutes.  Halfway through bake time, be sure to turn granola and rotate cookie sheets.  Remove from oven when granola is golden brown.  Allow to cool completely before storing in airtight containers.  Will last for at least two weeks.


Tuesday, June 4, 2019

Muddle and Twist

Who wants cake?  Or should I ask, 'who wouldn't want cake?' because I can't imagine someone turning down a slice of cake. The home cook-centric site, Food52, opened a challenge called Recipe Off-Roading where taking liberties with the recipes and/or ingredients was encouraged.  Four of Food52's  most popular recipes were chosen for the challenge--Marcella Hazan's Four Ingredient Tomato Sauce, Martha Stewart's One Pan Pasta, Food52's co-founder, Amanda Hesser's Peach Tart, and New York City restaurant Maialino's Olive Oil Cake.  Cooks signed up naming which of the four recipes they were taking off road.  I chose Maialino's Olive Oil Cake.  I LOVE olive oil cake.  It's an easy recipe that doesn't require a mixer and comes together quickly. 

After tossing ideas around with a friend about what to change, I decided to change the flavor profile just a bit.  The Maialino's cake uses Grand Marnier, I used bourbon and muddled bitters, giving the cake the hint of an Old Fashioned.  My favorite quality of a good olive oil cake is how it improves over time.  While it's great on the day baked, go back a day or two later and it's amazing.  The bourbon and bitters really came through on the second day.  I also made the recipe in standard muffins and minis--a way to indulge without feeling guilty. 

Be sure to check out the article showcasing all 71 off-road variations--including mine!  If you haven't made an olive oil cake yet, get yourself in the kitchen soon!   

Bourbon Old Fashioned Olive Oil Muffins
Makes about 24 standard muffins


  • 2cups all purpose flour
  • 1 1/2cups sugar
  • 1 1/2teaspoons kosher salt
  • 1/2teaspoon baking soda
  • 1/2teaspoon baking powder
  • 2sugar cubes
  • 8dashes Angostura Bitters
  • 3eggs, large
  • 1 1/3cups olive oil
  • 1 1/4cups milk
  • 1tablespoon grated orange zest
  • 1/4cup orange juice
  • 1/4cup bourbon

    Powdered sugar for dusting, optional
  • Pre-heat oven to 375 degrees. With a mortar and pestle, muddle 8 dashes of bitters with 2 sugar cubes. In a large bowl, add sugar cubes, flour, sugar, baking soda, salt, and baking powder. Mix well and set aside.  In a medium bowl, add olive oil, milk, bourbon, orange juice, orange zest, and eggs. Whisk well to make sure all ingredients are thoroughly mixed together. Line two 12-muffins tins with paper liners or grease and flour pans. (Non-stick cooking spray with flour works well too.  Gradually add wet ingredients to dry, mixing batter with a wooden spoon. Once all wet and dry ingredients are well-mixed, spoon batter into each muffin well to 2/3 full.  Bake for 30-35 minutes. Start checking at 30 minutes. The tops may not crack like a cake will, but do check for the tops turning golden to light golden brown. Also check for doneness by inserting a toothpick or cake tester into centers of each. It will come out clean if done.  Allow muffins to cool in pans for 20-25 minutes before turning out. Sprinkle with powdered sugar, if desired.


Tuesday, January 8, 2019

Do You Hear It?

The vague sound of a brass section coming down the street?  That's the sound of the bandwagon I'm about to jump on.  For what, you ask?  A soup that sounds totally unassuming as you're reading through the ingredients list.  And while it looks good in the photos, you're thinking, 'but it's just soup'.

But it's not just soup.  I suppose the first thing I should do is stop calling it 'soup' and start calling it 'stew.'  #thestew, to be accurate.  The hashtag currently has 3,108 posts attached to it on Instagram.  I believe it is totally deserving of each and every one of them.  New York Times Food/Bon Appetit writer, Alison Roman, first wrote about the stew in November.  I'm here to tell you it's delicious.  It's easy.  It's hearty without being overly filling.  We've had a couple of rainy, cold, and grey days here in Los Angeles (it's Winter, after all) and it was the perfect kind of weather for this stew.

You may have caught Alison on the 'Today Show' last week on one of their food segments.  I missed the original NYT article, but happily caught her appearance.  You can see it here.  Watch it, then run to the kitchen and make #thestew.  I'll be looking for your post on Instagram tomorrow night.

Alison Roman's Spiced Chickpea Stew with Coconut Milk that I riffed slightly.

Serves 2

2 tbsp olive oil
2 cloves garlic, minced
1/2 yellow onion, minced
1 inch piece of ginger (peeled and grated)
1/2 tsp red pepper flakes
1 tsp tumeric
1 15 oz can garbanzo beans, drained and rinsed
1 15 oz can coconut milk, full fat
1 cup vegetable broth
1-1 1/2 cups kale, torn from stalk
cilantro, for serving
2 tbsp yogurt
salt and pepper

In a pot over medium heat, add olive oil, garlic, ginger, and onion.  Saute until onion turns translucent and edges begin to brown.  Add garbanzo beans, red pepper flakes, and tumeric.  Allow garbanzo beans to get a little brown on them--8 to 10 minutes.  Season with salt and pepper.  Set aside about a quarter cup for garnish.  Add vegetable broth and coconut milk.  Stir all ingredients and smash chickpeas as much as possible.  Turn heat to simmer, stirring occasionally.  Let cook for 30-35 minutes.  You'll see the stew thicken around the 30 minute mark.  Add kale, stir, and cook until softened, but still bright green.   Ladle into bowls, garnish with cilantro, reserved chickpeas, and a dollop of yogurt.

The original recipe calls for mint, not cilantro, but I'm not a mint fan.  Feel free to use it if you are.  Also, the kale can be substituted with spinach, collard greens, Swiss chard, or any other leafy green you like.  Add more red pepper flakes if you want to take the spicy up a notch or two.  The original recipe also calls for serving with lavosh or pita.  I found it to be unnecessary, but if you want to sop up all the stewy bits...go to town!

In other news, I want to wish you all an amazing and abundant 2019.  And it will be.


Wednesday, October 31, 2018

The Season of the Pumpkin Things

Bless me, Father...it has been roughly two years since my last rant on pumpkin spice-flavored things.  I just scoured the blog to see how many posts I've written with recipes containing pumpkin.  In the nearly eight year history of this blog, there have been exactly four recipes with pumpkin.   Today I will bring you Number 5, but not before I go on another tiny rant.

Let me say that I am not anti-pumpkin.  I know I am very late to the Pumpkin Appreciation Society party.  I don't exactly understand the deep love that some have for pumpkin spice things.  Every year it seems that the grocery stores have yet another endcap full of items flavored with the squash, and some mixture of cinnamon, ginger, nutmeg, allspice, and cloves.  I'm not the only one who thinks the overabundance of pumpkin spiced things is a little over the top.  You can see for yourself in this article published on Eater last year.  I'm also sure that since this article was published, there have been even more pumpkin spice flavored foods created. 

Despite not understanding the obsession, my appreciation is true.  I just don't need a cabinet full of Pumpkin Spice Oreos, Pumpkin Spice Cheerios, Pumpkin Spice marshmallows in my hot chocolate, or Pumpkin Spice Creamer in my morning coffee.  Or Pumpkin Spice Eggnog...just because. 

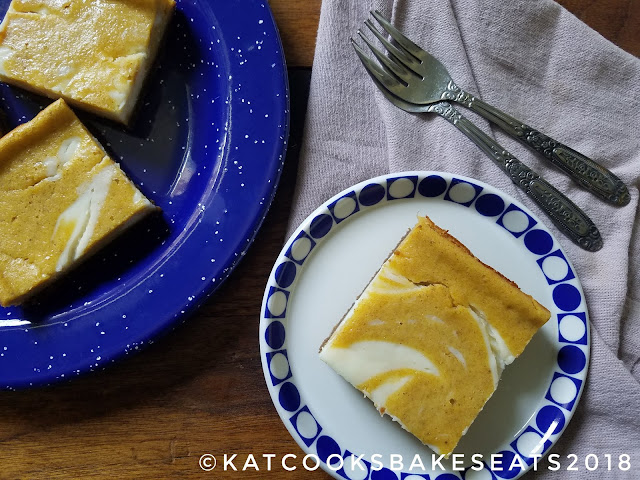
But if you ask me what I think of a pumpkin bar with a spiced wafer crumb bottom and swirled with cream cheese?  Well...I will say, yes, please, and thank you...do you mind if I have two?  The cookie crumb will get even better the second day they're around (if they don't last that long...it's okay.)  I made these in an 8x8 inch pan, which I love.  It's manageable and still gives you enough to share if you feel like it.

I used my favorite Fall cookie here for the crumb.  If you're in the greater Philadelphia, PA area, I suggest running to the grocery store and picking up a box or two of Sweetzel's Spiced Wafers.  It's good to have family back East who send you your favorite Fall cookie.  If you don't have them, gingersnaps would work just as well.  You could also use graham crackers, but the spice in the crumb really makes these great.  You can happily and easily use canned pumpkin (be sure it's not pumpkin pie filling) or grab a sugar pie/pie pumpkin from the grocer's or the farmers market and make your own puree.  It's as easy as halving a pumpkin, scooping out the seeds, drizzling with some oil or butter, and roasting for 40 minutes in a hot oven.  I just find making my own so satisfying.  


Pumpkin Cream Cheese Swirl Bars
Makes one 8x8 inch pan

Cookie Crust

1 ¾ c spiced wafers cookie crumbs
6 tbsp butter
½ tsp salt
1 tbsp sugar

Filling

¾ c sugar
4 tbsp flour
8 oz cream cheese, softened
1 tsp pumpkin pie spice
2 eggs
12 oz pumpkin puree
1 tbsp milk

For the crust: Pre-heat oven to 350 degrees. If using whole cookies, break them into pieces, put in a food processor and process until fine crumbs. Put in a bowl with sugar and salt and mix well. Melt butter on stovetop, then add butter to crumbs, mixing well. Line the pan with parchment, pour the crumbs into the pan, pressing down and into corners with a spatula until crust is evenly spread. Bake for 6 minutes, remove from oven, and allow to cool. Turn oven up to 375 degrees for baking bars.

For the filling: In a medium bowl, cream sugar, flour, and cream cheese. Mix until smooth and reserve about a half cup of the mixture to the side.  Add the pumpkin pie spice, eggs, and pumpkin puree, mixing until incorporated and smooth.  Pour batter into 8x8 pan and spread evenly. Mix milk with reserved cream cheese mixture until smooth.  Spoon sporadically onto batter and make swirl with the tip of a knife.

Bake until knife inserted in center comes out clean.  Approximately 45-50 minutes. Remove from oven and allow to cool. Once mostly cool, chill for at least 4 hours or longer. Remember to run a knife edge along inner edges of bars if you plan on removing from pan.


Thursday, October 11, 2018

Can You Be Obsessed...

...with cake?  Not just being pro-cake.  More than just proclaiming, 'I much prefer cake over pie.'  (That's me)  But...can you be obsessed with a cake?  Can you like a cake so much that you make it once and before it's been completely consumed--not solely by you, thank god--you are already thinking about making it again?  Like NOW.  It's similar to how I felt after I got my first tattoo.  No sooner did I have the first one, not even fully healed, that my mind was swirling with ideas on what the next tattoo would be and where it would go.

If you make this yourself, you'll understand why I couldn't stop thinking about it.  The original recipe  is from Christopher Kimball's 'Milk Street' magazine.  My absolute favorite part is that it's a one bowl recipe--all you need is a bowl and a whisk (and a cake pan, naturally).  No mixer, no fancy gadgets.  The best kind of recipe.  For those of you who are gluten-free...guess what?  It's gluten-free!  The cake, hailing from Galicia, Spain, is known as tarta de Santiago.  Traditionally, it is dusted with powdered sugar using a stencil of the cross of St. James the Great, who is reportedly buried in the region's cathedral.

It's a dense cake.  On the Instagram post, someone commented that it is the perfect marriage of marzipan and meringue.  (It IS!)  It gets better the next day or even the day after that.  A friend drizzled a piece with blackberry honey...and holy crap...it was good.  You can pair it with whipped cream and berries as they do in 'Milk Street.'  It would probably be awesome with vanilla bean ice cream.  But, truthfully, I prefer it in it's simplicity.  Just give me a good cup of coffee to accompany a slice.

The recipe in 'Milk Street' uses 1/4 tsp almond extract and 1/4 tsp vanilla extract and no zest.  After reading the article, I did a little Googling to learn more about the cake and decided I wanted to try adding citrus as it's a more traditional way of baking it.  Either way, you'll love it.


Galician Almond Cake (Tarta de Santiago)
adapted from the recipe on Milk Street's site
makes one 9-inch layer cake

1 cup white sugar
3 large eggs
3 large egg whites
1/2 tsp salt
1/2 tsp almond extract
2 1/2 cups blanched almond flour (not almond meal)
zest of one medium lemon
zest of one medium orange
3 tbsp turbinado sugar
1/3 cup sliced almonds

Pre-heat oven to 350 degrees.  Line a 9-inch cake pan with a circle of parchment and butter the sides.  In a mixing bowl, add the white sugar, eggs, egg whites, almond extract, salt, and citrus zests (roughly 2 tbsp altogether).  Whisk until well-mixed.  Add almond flour and mix until incorporated.

Pour batter into lined cake pan.  Sprinkle top with almonds and turbinado sugar.  Try to alternate, so sugar will caramelize on top of cake and on almonds.  Bake 50-55 minutes, until top browns.  Cake should feel firm when tested with a slight press of finger.  Remove from oven and allow to cool for 10-15 minutes.  Run a knife along inner edge of cake before turning out onto plate.  Then invert on second plate.


Wednesday, March 14, 2018

Leprechauns and Sunshine

Going on the premise that everyone is a little bit Irish on St. Patrick's Day, I thought some playing around with the bottle of Jameson Caskmates Irish whiskey would prepare me for celebrating on the 17th.  Having been aged in craft beer barrels, the Caskmates Stout edition has notes of cocoa, coffee, and butterscotch.

With Winter being the height of citrus season, I tend to have more than a fair share of oranges in the fruit bowl.   Orange and chocolate pair well, and with the chocolate bitters in the pantry, tools for a concoction were right at my fingertips.  This Saturday, don a little green, make some colcannon, and whip up this easy cocktail that I've dubbed...the Sunkissed Leprechaun.  A little Irish mixed with a dose of sunshine.

The Sunkissed Leprechaun
Makes 1 drink

1 oz Jameson Irish Whiskey (Stout Caskmates used)
2-3 oz orange juice
3 dashes chocolate bitters
orange slice for garnish, optional 
ice

On the three occasions when I made this drink, I did not use a cocktail shaker.  You absolutely could, if you wanted to.  I mixed the whiskey and bitters together in a glass, added the orange juice, mixed again, and added an ice cube or two.  If you use a shaker, mix all ingredients in shaker with ice, strain into glass and enjoy.