Pages

Saturday, December 24, 2011

A Little Holiday Cheer...

I want to wish everyone a very Merry Christmas...Happy Holidays...Happy Hanukkah...Fabulous Festivus or whatever it is that you happen to celebrate at this time of year.

Enjoy the time you spend with your family or if you can't be with your family, then the friends who have become your family.

May it be filled with joy, love, lots of laughter, and of course, good food with even better company.


And because I like it old school...it doesn't get much better than this...


Thursday, December 22, 2011

Twelve Pounds of Flour Later...

...and the oven is getting a wee bit of a break...well, not so much, I'm roasting peppers in it at the moment.  Since the month started, it's been a pretty non-stop whirlwind of sugar, flour, butter and baking powder in the kitchen.  This year I've also been a little obsessed with baking savouries....we're talking crackers.    I'll be honest...I've been pretty selfish with those.  Oh sure...wine biscuits have found there way into goodie baskets for the family and my Girls...but the crackers don't get much further than me.  They're so easy to make and you can add pretty much anything to the basic dough.

I originally made Olive and Rosemary crackers from The Purple Foodie last year and loved them.  I made more yesterday.  But it was a couple of weeks ago when I was looking through my King Arthur Flour Baker's Companion book and found the recipe for Sesame Thins.  It doesn't get much easier than flour, water, oil, salt and sesame seeds.  I'll tell you one reason I love this recipe.  It's yeast-less.  I'm still working on the yeast-baking skills and it's going all right.  I made grissini the other day and they turned out wonderfully.  Though I'm the only one that knows it.  (Selfish again...I'm not afraid to admit it!)

I played with that Sesame Thins recipe.  I have a jar of blue cheese stuffed olives in the fridge and after a Friday night dirty martini I thought how cool would that be in a cracker?   Whether the people at Ketel One vodka thought that's where their product would wind up, I don't know...but it's a winner with me.  Of course, you can make them without the alcohol as it only gives it a slight punch in taste to the cracker, but if you're so inclined to make a little something fun for your holiday cocktail party...try it.  Or be totally selfish, buy a nice wedge of aged provolone from the neighbourhood Italian deli and make a dinner out of cheese and crackers.

Dirty Martini Crackers
(Adapted from King Arthur Flour's Sesame Thins)

1/2 cup chopped green olives (stuffed or not)
1 teaspoon minced garlic
4 tablespoons vodka (optional)
2 cups flour
1 teaspoon salt
1/4 cup olive oil
1/2 to 3/4 cup water

Add 2 tablespoons of vodka to the chopped olives and let marinate for about an hour.  Pre-heat oven to 325 degrees.  Mix flour, salt, and oil in a bowl and combine with fingers until you have a crumbly dough.  Add olives, garlic and the last 2 tablespoons of vodka.  Work with fingers to combine.  Start with a half cup of water to bring all the ingredients together to make a more cohesive dough.  If still dry, add more water slowly.  Knead for a couple of minutes, then turn dough onto a flour-covered board.  

Roll dough out to 1/4 inch thickness or less.  Cut into whatever shapes you like.  I used a small  (1.5 inch) biscuit cutter with the fluted edges.  You can also just lay the rolled dough onto a baking sheet and cut with a pizza cutter.  

Bake for 25-30 minutes until bottoms are golden brown.  Definitely begin to check on them at the 25-minute mark depending upon how hot your oven runs.  

Dirty Martini Crackers

Sesame Thins and Olive Rosemary Crackers
Chocolate Crackles
Earl Grey Cookies

Grissini with Smoked Salt
Cherry Chestnut Drops
Cinnamon Shortbread


Monday, December 5, 2011

Ready...Set...Bake...

I turned the oven on this morning at 10:30 a.m. and finally turned it off a little after 9 p.m.  It certainly was a baking day.  Three kinds of biscotti and two kinds of crackers.  I like finding a 'basic' recipe that can be well adapted to additions or simplification.  Today it happened twice!  

Today I made Chocolate Hazelnut Biscotti, Cranberry Pecan Biscotti, and what I think is now my favourite biscotti, Alice Waters' Anise Almond Biscotti.  I'm going to go out on a limb and proclaim that biscotti have to be my favourite cookie.  You can pretty much add anything you want to it and I love how it can be part of an enjoyable ritual.  While you can just munch away at it, the preferred method of sitting down with a biscotti or two and an espresso or cup of tea to dip your cookie in and taking your time to savour the flavours is so appealing.

The 'To Bake' list keeps changing slightly because I keep coming across various posts from magazines or other blogs and thinking how great it would be to make something else.  We'll see where it all ends up.  I managed to get photos of the biscotti today, but the crackers will have to wait.  I love the shorter days, though I don't love missing out on a couple of extra hours to take photos.

I also have Cinnamon Shortbread on the brain and may just get the dough ready tonight and bake them up tomorrow.

Chocolate Hazelnut Biscotti
(Adapted from Giada De Laurentiis' Citrus Biscotti in Everyday Italian)


2 cups all purpose flour
1/2 cup cocoa powder
1 1/2 teaspoon baking powder
1 teaspoon salt
1 teaspoon espresso powder (optional)
1 cup sugar
3 eggs
1 teaspoon almond extract
3/4 cup toasted hazelnuts, chopped


Pre-heat the oven to 325 degrees and place hazelnuts on a baking sheet.  Toast nuts for 10-15 minutes, transfer to dishtowel to remove skins and chop roughly.  In large bowl, combine flour, baking powder, salt, cocoa, and espresso powder.  Mix well and set aside.  In another bowl, combine sugar, eggs, and almond extract.  Whisk until well combined.  Add flour mixture gradually to make dough.  Stir in hazelnuts and mix to combine.  Dough will be soft and sticky.  Allow to sit for 5 minutes.


On a floured board, split dough in two equal pieces and form logs about 14 inches long and 3 inches across.  Transfer to parchment lined baking sheet.  Bake for 30-35 minutes.  Remove from oven and let stand for 5 minutes.  On cutting board, cut logs in half-inch slices and place face down on baking sheet.  Bake for another 10 minutes, then turn cookies over and bake for an additional 10 minutes.  


While you're waiting for the biscotti to finish baking, you can always make yourself that cup of espresso...


Friday, December 2, 2011

A Beauty in the Flesh

Thanksgiving is once again behind us, it's December and Christmas is a mere 2 days shy of 3 weeks away.  Do you ever wonder where the time goes?  Or just how quickly the months go by now?  I hope your Thanksgiving (for those that celebrated) was full of love, family, and lots of good food.  I skype'd with the family, then spent mine with Jill and her family and brought homemade Oreos.  (Yes, they have made it to this year's Christmas Baking List).

I think I've been in a little funk lately.  Come to think of it, I'm pretty sure this happened last year too.  Time to shake myself out of it, because I've got a lot of cooking and baking to do over these next three weeks!  The past week was also memorable because I was asked to make appetizers for seventeen...and GOT PAID to do it!  I think it officially counts as my first paid job to cook!  Woo!  It wasn't anything too too fancy, as it had to be ready and delivered the day before Thanksgiving, but I think it all turned out great.  Baby steps, right?  I also had one of my co-workers ask if I would do the same thing for her.  You bet I would!  This may be the start that I'm looking for.

The next couple of weeks are going to be filled with lots of flour, sugar, and eggs.  Think homemade Oreos, Italian Polenta Cookies, biscotti, shortbread, and a few new additions both sweet and savoury.  I'm just hoping I haven't picked too many to accomplish...though somehow I seem to get it all together and sent off in time.

But let me tell you about what I found last night.  I stopped at the grocery store to pick up a couple of items and in the produce section, I was looking at the apples.  At first, I decided that I didn't need any, knowing I still had a couple Golden Delicious and a few Granny Smiths in the fruit bowl at home.  Then...I saw them.  Deep red...but not the shiny red-red Red Delicous...nor the mottled red and greenish gold of Fujis, Galas, Jonagolds, or Honeycrisps.  No...these were darker and decidedly more intriguing.  The skin is closer to burgundy.  The handwritten sign above them read 'Arkansas Black.'  Is it wrong to think of an apple as 'sexy?'  The Arkansas Black is sultry. Like a beautiful girl with full, pouty lips, and long hair worn with a Veronica Lake sweep.  I googled and this is what I found out through the Encyclopedia of Arkansas History and Culture site

The Arkansas Black Apple is recognized by early sources as having been first produced in 1870 in the orchard of a Mr. Brathwaite, which was then about one and a half miles northwest of Bentonville (Benton County). The fruit, a variety of Winesap, is usually round and of medium size. The flesh is yellow, fine grained, crisp, juicy, and aromatic, while the skin is dark red to black, hence its name. It ripens in October or November, and the fruit keeps well though the storage season of two to four months. Originally, the tree was thought to be a seedling of the Winesap Apple. It is a true native apple grown in the Ozarks of both Arkansas and Missouri.

I haven't eaten one yet, but they smell amazing.  I'm thinking of baking one for breakfast tomorrow with a big bowl of oatmeal.  That is, if I can stop looking at them long enough to actually eat one.


Of course, there's a song to go along too...


Sunday, November 13, 2011

What's Going On?

I am a creature of habit.  I love making lists. It's comforting...some may say I have control issues.  ;)  It's how I convince myself that I'm organised.  Well...not totally disorganised.  I went grocery shopping today--with my list.  Separated by store, with their respective bargains, the top right corner of every grocery list with what I must buy.  After my first stop, my list disappeared.  I don't know what happened to it.  It wasn't in my wallet.  It wasn't in my handbag or in one of the grocery bags.  DAMN!  I was feeling a little lost at my second stop, trying to remember what I had written down.  But I'm happy to report, I survived.  I may have veered off course a wee bit--a wedge of Black River Gorgonzola and a pound package of lady fingers--but I'm okay.  Look Ma, I don't need a list in my hand (pocket, handbag, glove box) all the time.

The kitchen has been its usual busy self.  My mind is beginning to race with what to bake and make for the holidays (both eating and giving).  I made mini cinnamon scones and cream cheese cookies (aka 'crack cookies') for a work meeting, and I baked a second round of Oreos today.  One of the problems I have (if you want to call it that), is once I make something, and it's really good, I'll make it again...and again...and again.  Case in point...applesauce.  My first go-round was Asian pear sauce; since then I've made apple-pear sauce, persimmon-peach sauce and plain old applesauce.   The same has happened this week with chicken.  I cooked four large breasts the other night because I had an idea to make a variation on golumpki.  It involved steamed cabbage leaves, shredded chicken, sauted carrots and onions, and basmati rice with lots of curry powder and sesame oil.  The results were good...the execution needs improvement.  So now I have a lot of leftover chicken.  It's been 3 days of chicken salad (again...and again...and again), but let me tell you...the cats are thrilled.  It's not every week where they get a daily dose of chicken.  They can smell it a mile away and are all sitting pretty while I get their bits ready.

Here are some photos from the last week.  It may be a bit of the same old, same old....but it's still delicious.

Mini Cinnamon Scones

What can I say?  The price was right!  Now I have to decide to what do with them.

Jill's Fabulous Onion Tart

Oreos Round 2:  Softer Cookies, Better Filling

Persimmon-Peach Quick Bread

Persimmon-Peach Sauce, aka The Obsession

Chicken Stuffed Cabbage...Thai Golumpki?

A song to start the week....just as relevant today as it was in 1971...


Friday, November 4, 2011

One Year to the Day...

...I started this blog.  That's right...it's the one-year anniversary of Kat Cooks Bakes Eats!  When I started writing, I figured if I was lucky, I'd have some friends and family read a post or two and indulge me.  I look at that traffic widget and I still cannot believe the locations that check in here.  I am floored, flabbergasted, grateful, and humble that so many people find their way and actually read this.  The internet is a BIG place and I have a very, VERY small space in it.  Thank you, thank you, thank you!

Now, if I didn't talk about food, I'd be doing you a disservice.  Last week, three of my best friends (affectionately known as The Girls) and I met for lunch at Breadbar in Century City.  It was my first time there and I really enjoyed it.  I had the Cauliflower Soup and finished every last spoonful.  It was amazing.  Served with homemade croutons and drizzled with a curry infused oil.  Like I said...AMAZING.  I came home, determined to make it myself.  I don't think I was home half an hour before I poured olive oil in a jar and added a liberal amount of curry powder to the oil.  Over the past week, I'd shake the jar, turning it over and over to mix the spice and oil together.  I bought a head of cauliflower over the weekend, already had cream in the fridge, made croutons late last week and had vegetable stock in the freezer.  All the ingredients at the ready.  Last night was the night.  The air was turning cooler and the clouds started rolling in (Yes!...we're going to get a bigger taste of Autumn here...rain and cold weather for longer than a day).

I changed the soup up a bit, turning it into roasted cauliflower and carrot soup.  It was absolutely delicious.  I still topped it with the curry oil and homemade croutons.  Just right for a cool evening and definitely would have been better with a grilled cheese sandwich accompanying it, but I was feeling a tad lazy and didn't want to wait to have my soup.

Roasted Cauliflower and Carrot Soup
(by me)


1 medium head of cauliflower, cut into small florets
2 carrots, peeled and cut into 1-inch pieces
6 cloves garlic
2 tablespoons olive oil
1 tablespoon grated Parmesan-Reggiano cheese
3 cups vegetable stock
1/4 cup heavy cream
salt and pepper to taste


Optional:  curry oil, croutons


Pre-heat oven to 400 degrees.  Toss cauliflower, carrots, and garlic with olive oil in oven-proof dish.  Sprinkle Parmesan and a bit of salt and pepper before popping it into the oven.Roast vegetables until soft (not too soft, not too hard, but just right), about 40 minutes.   In saucepan, heat stock and add vegetables.  Bring to high simmer for 5-7 minutes.  Remove pan from heat, and with immersion blender or regular blender, puree vegetables and stock.  Add cream and mix to combine.  Add salt and pepper to taste.


You don't need to drizzle it with curry oil or top with the croutons, but I highly recommend it.  I love how the curry flavour mixes with the cauliflower.


Sunday, October 30, 2011

A Busy Oven...

...ah...here it is...the first day back to work after vacation...though between you and me, I'd prefer to spend my time in the kitchen baking...but as it stands right now, that won't pay the rent and bills...so back to work I go.

I did a fair amount of baking, but it doesn't seem that way.  Maybe because it was spread out over the week, and it wasn't as much as I hoped.  You know the list you make in your head is always so much longer that what actually happens (in my case, at least!).

I tried my hand at oreos and was happy with the results for the most part.  I'm going to do a little tweaking with both the cookies and the filling.  Let me tell you how dangerous it is to have the recipe for oreo filling since I'm a Eat-The-Filling-Before-The-Cookie kind of girl.  I won't even admit to eating it by a spoonful or two before piping it onto the cookies.  I'm going to make them smaller on the next go-round, use clear vanilla extract (the Mexican vanilla extract tinted the filling a tiny bit), and drop the baking time down a minute or two to see if I can get a slightly softer cookie.  I used the recipe from Smitten Kitchen and think it's pretty darn fabulous.

Fall makes me crave Jewish Apple Cake and for the second year, I made one of the recipes mom gave me.  I even went and looked to find out why its called 'Jewish Apple Cake' and found a good explanation from Philadelphia's City Paper from a few years ago.  I'm happy I was able to share some of this cake with a couple of friends, otherwise I'd be in trouble.  I'm still in a bit of trouble as I have half a loaf left and this cake with coffee makes a morning for me.

While I was visiting my friend, Jill, this week and sharing Jewish Apple Cake, we talked about baking bread.  I made a comment about wanting to make soft pretzels and that put the idea back to the forefront of my brain.  I'm still a little intimidated when it comes to baking with yeast.  I need a lot of practice in this area and Jill let me borrow her copy of 'The Bread Bible' by Beth Hensperger.  The book doesn't have a pretzel recipe, but there are loads that I want to try.  Fingers crossed, I'll get better at this!  I found a great recipe for pretzel bites from The Curvy Carrot and will be using this all the time.  I love soft pretzels and how cool to not have to buy them anymore???  Seriously, when you pop one of these little guys into your mouth as they've just come out of the oven...it's heavenly.

Jewish Apple Cake
(Adapted from a recipe by Our Mother of Sorrows Ladies Guild in Bridgeport, PA via Mom)


Note:  This cake is supposed to be made in either a tube pan or a Bundt pan.  I have neither, so I make them into loaves.  This recipe will give you two.  I'll note what the original recipe calls for in parenthesis.


3-4 apples, peeled and cut into cubes [I used Jonagold and Granny Smith]
      (original recipe calls for 5-6 apples)
2 teaspoons cinnamon
5 tablespoons sugar
3 cups flour
1 cup sugar (original calls for 2 cups)


1 cup vegetable oil
4 eggs
1/4 cup orange juice 
3 teaspoons baking powder
2 1/2 teaspoons vanilla
1 teaspoon salt


Pre-heat oven to 350 degrees.  Grease and flour cake pans.  In a separate bowl, mix the apples, cinnamon, and sugar.  Toss to coat and set aside.  Combine the rest of the ingredients in a large bowl and beat until batter is smooth.  Pour some of the batter into pans and spoon some of the apple mixture on top.  Pour remaining batter into pans and top with rest of the apple mixture.  


Bake for one hour or until golden brown.  (Original recipe says to bake for an hour and a half.  I began checking on the status of the cakes at the 50 minute mark and they were finished by the hour mark.  If you use loaf pans, they definitely won't need the full hour and a half baking time).  Once out of the oven, let cool in pans on rack for 10 minutes before removing from pans.  


Tuesday, October 25, 2011

Me...Time Off...

...and a camera at the ready.  There's Jewish apple cake in the oven as I write...I went through my closet today and sorted a little more...and only purged a wee bit...I took a few photos today because it was overcast, rainy and grey and I loved the diluted light...I hung a new print in my kitchen that makes me smile every single time I look at it and reminds me of the kind of people I want to surround myself with...and for the first time in quite a while, I dug out my sketchbook and doodled...I don't draw all that well...but it worked for what I was doing...

It's Day 4 of the vacation...with 4 more left...I don't know what the next four days will hold (only what my to-do list says)...but it's full of possibilities and precious time.

Those amber eyes of Suki make her look like Demon Cat...and she's so not.

Love the mix of colours

The Smile Producer

Autumn Still Life

In context
Doodles

Saturday, October 22, 2011

Fall With a Twist

You know it's Fall in Los Angeles when the temperature hits about...70...and stays there for a day or two until it leaps back up to the 90's (like today, almost 2 p.m. and 93 degrees).  I took advantage of the cooler weather the other day and made Asian pear sauce.  Like applesauce, but not.

I'm currently loving The Kitchn site and get regular email updates.  While reading my email the other morning, there was a  post about making applesauce.  I still hadn't had breakfast, couldn't put my finger on what I wanted to eat, but after reading the daily post, thought about the 2 close-to-overripe Asian pears in my fruit bowl.  Sure, I could make applesauce too since I bought a few at the market, but I have those earmarked for Jewish Apple Cake this weekend.

It really was quick to come together.  Warm, delicous, reeking of Autumn and a nip in the air...only with a twist of bright sunshine and palm trees outside the window.

Asian Pear Sauce
(Adapted from a recipe on The Kitchn)


Makes about 1/2 cup


2 medium-sized Asian pears, peeled and cubed
3/4 cup water
1 cinnamon stick
1/4 teaspoon lemon zest
1/4 teaspoon orange zest
1 slice fresh ginger, about 1-inch diameter


Combine all ingredients in small sauce pan.  On medium heat bring to high simmer, then lower heat and simmer for about 20 minutes.  Don't let the liquid evaporate completely, add a little more water if needed.  After cooking, remove cinnamon stick and ginger.  Puree in blender, processor, or with immersion blender.  Or do it the old fashioned way and mash it with a fork. 

Sprinkle with more cinnamon (I can never get enough) and/or nutmeg.  Spoon it over oatmeal or just spoon it into your mouth.  Especially yummy with butter-slathered toast.


Friday, October 21, 2011

Take Two...

Today at 4:45 p.m. my vacation began.  I say 'Take Two' because it's so close to the time off I took in August...not too long ago, but long enough that I'm thrilled with the time off now.  This will be a welcome respite from the Hell that will be 'Another Holiday Working in Retail,' a.k.a 'The Day Job.'

I have a couple of posts that will find their way to print in the next day or two, but in the meantime, here's a photo of a great little item my sister sent me.  I love matryoshkas, and this is just too cool for words.  Measuring cups!!  Nesting measuring cups that look like Matryoshkas!  Practical and stylish...my kitchen counter is a hipper space because of them.


Sunday, October 9, 2011

You Never Get Tired...

...of some foods.  Take a grilled cheese sandwich and a bowl of piping hot tomato soup.  Remember that when you were a kid?  I do.  White bread slathered with margarine, three slices of white American cheese, grilled just a little past the well-done side, cheese oozing, and for me, a bowl of Campbell's ABC Vegetable soup.  I could taste it before I even took a bite.  It was always 'right.'  Perfect comfort food; perfect for lunch or dinner, in summer or fall, on a bright day or with a storm raging outside.

The palate changes as you age.  You find new favourites and try new cuisines with tastes subtle or bold.  Then you think about the old stand-bys and what would happen if you tweaked the ingredients.  You think it's time to venture past that can of Campbell's and the loaf of Stroehmann bread.

It might look something like this:


Barbari bread replaces your white bread, Mozzarella and Fontina stand in for the American cheese, and (what would surely make most children cringe in disgust) a few leaves of spinach between the cheese.  You think it's high time you made your own tomato soup and find another use for the tomatoes you cannot stop roasting.

Still right, even on a sunny 85 degree day in Los Angeles.

Cream of Tomato Soup
(Adapted from a recipe on the kitchn)

2 tablespoons butter
1 small onion, chopped
1 celery stalk, chopped
1 1/2 teaspoons dried basil
pinch of ground cloves
2 tablespoons flour
2 cups roughly chopped oven-roasted tomatoes 
pinch of baking soda
2 cups chicken or vegetable stock 
1 cup milk
tomato paste, as needed
salt and pepper to taste

Melt butter in a large pot on medium heat and cook celery and onions until soft.  Add basil and cloves.  Left flavours mingle for a minute or two.  Add flour and cook for an additional couple of minutes.  Add tomatoes, baking soda, and stock.

Lower heat to simmer and let cook for another 10-12 minutes, stirring occasionally.  Remove pot from heat and puree soup, either in batches in a blender or with an immersion blender.  When soup has been pureed, return pot to heat and add milk.  Stir to blend.  More milk or stock can be added to thin soup if it's too thick.  Add tomato paste, if necessary, to impart stronger tomato flavour.  Add salt and/or pepper to taste.  Can be topped with chopped fresh basil, a dollop of creme fraiche or sour cream, or homemade croutons.  

**Notes:  I used Roma tomatoes and low sodium chicken stock from Trader Joe's.  I ended up using 3 tablespoons of tomato paste, because I really wanted a strong tomato flavour.  I also topped the soup with a  healthy dose of creme fraiche.  For leftovers on Day Three, I added cooked spaghetti squash to the soup and topped it with homemade garlic croutons.


Wednesday, September 28, 2011

Short and Sweet

...is the lifespan of fig season.  Picked ripe from the tree, once you have your hands on some there is precious little time before they begin to spoil.  When fresh figs are available, I feel that I'm under the gun to get some and make something fabulous.  I bought two pounds of California Black Figs from Trader Joe's on Sunday night, because I had Monday off from the day job (more truthfully, the day, night, and weekend job).  I was originally planning on making Melinda Lee's Candied Figs recipe, thinking I could make a big batch and use them for Christmas gifts, but then I starting thinking about fig cake and Googling away for ideas.

What did I end up making?  I posted on Facebook that I had two pounds of figs and wasn't sure what to make with them, and two friends were kind enough to send suggestions.  The first idea was to top a pizza with figs, gorgonzola and pine nuts, and the other was to make preserves.  So I ended up making a fig, Gorgonzola and pancetta galette, fig jam, AND the fig cake.

Don't ask me to choose a favourite.  They're all delicious.  The galette was a wonderful dinner with an arugula salad, the fig cake is one of those rustic, good-for-anytime cakes with a perfume of fig and lemon.  It smells so Italian to me and with an espresso, topped the night.  The fig jam has citrus notes from both orange zest and a healthy dose of triple sec.   I'm tempted to make just a small amount of ricotta and have some crusty sliced bread topped with the cheese and jam.  Just so you know, National Fig Week is November 1-7.  Obviously, I couldn't wait that long to celebrate.


Fig, Gorgonzola and Pancetta Galette
(adapted from Saveur's Leek and Zucchini Galette recipe)

for the crust:

1 1/4 cups all purpose flour
1/2 teaspoon salt
1/2 teaspoon sugar
8 tablespoons butter, cut into small pieces
4-6 tablespoons ice water

for the filling:

10-12 figs, quartered
1/3 cup onion, thinly sliced
4 slices pancetta, chopped
2/3 cup crumbled Gorgonzola
2 tablespoons butter

Combine flour, sugar, and salt in bowl.  Cut in butter until mixture resembles rough crumbs.  Add water tablespoon by tablespoon until dough comes together but isn't too sticky (for me it's between 4 and 5 tbs).  Form into a disc and refrigerate for an hour.

Pre-heat oven to 350 degrees.  In large skillet, melt 2 tablespoons butter and saute figs and onions until onions are softened.  Remove from heat.  In smaller pan, cook pancetta until it just begins to brown.  (It will finish cooking in the oven.)  Mix figs, onion and pancetta together to let flavours mingle while waiting for dough to chill.

When dough is ready, on floured board, roll dough to roughly 1/4 inch thickness and about 12-14 inches round.  Add fig mixture to dough leaving about an inch and a half edge of crust all around.  Top mixture with crumbled Gorgonzola and fold edges up.  Bake until crust is lightly browned, about 45-50 minutes.

Fig Jam
(makes about a cup)

12-14 figs, cut in quarters
6 oz water
1 cup sugar
3 tablespoons triple sec or Grand Marnier
1 teaspoon orange zest
pinch of lemon zest

Combine all ingredients in a large saucepan over medium heat.  Bring to a low boil, stirring constantly.  Lower heat and let simmer until mixture begins to thicken, about 25 minutes.  Stir frequently to keep jam from scorching.  Remove from heat and let sit.  Jam will thicken further.  You can use a potato masher to smash the fruit even more, if you like.  Store in refrigerator.  

The fig cake recipe came from the 'Lemon and Anchovies' blog and can be found here.  I followed the recipe exactly and still feel it doesn't need any tweaking.

Monday, September 19, 2011

A Taste of the Tropics

I have friends (Hi Cathy and Mike!) that packed up a couple of years ago and left Los Angeles for Austin, TX.  Rarely does a day go by where I don't miss them and still wish they lived here.  Selfish, I know!  I consider myself a lucky girl to have them in my life, even if they don't live 15 minutes away anymore.

One of the bonuses of living in Los Angeles is there being a good chance that you'll have a fruit tree in your backyard.  Though not nearly as numerous as the groves once were years ago before L.A. became so populated, you'll still find them.  I just noticed a couple of days ago that a house two doors down has a pomegranate tree (and they're looking close to ripe!).  I'm considering being a friendly neighbour and getting to know them and get some fruit off that tree.  But, back to my original point.  Cathy and Mike's backyard had fruit trees, including a guava tree.  Two summers ago, I came home after one visit with a massive amount of guava and not a clue as to what to do with it.  I finally decided on cookies, nothing fancy, but that would showcase the guava.  I had some desiccated coconut on hand and thought it would make for a tropical treat.  Those cookies were delicious and popular.

I still had guava nectar in the freezer and thought of those cookies last week.  I also had coconut, so I thought I'd give the cookies another go-round because I hadn't made them in well over a year.  Yeah, they are still fabulous.  But do me a favour, okay?  Don't tell the people I work with.  I don't always share.  This batch stayed with me, (except for a dozen that I did part with.  Hello, willing new tester!).  I know, I know...selfish!  I think you would be too.

Guava-Coconut Cookies
(Adapted from Thick White Cookies by Jean Pare in 'Company's Coming: Cookies')


1/2 cup butter, softened
1/2 cup sugar
1/2 cup brown sugar, packed
1 egg
2 tablespoons milk
1/2 cup guava nectar
1 teaspoon vanilla
3 cups all-purpose flour
2 teaspoons cream of tartar
1 teaspoon baking soda
1 cup desiccated coconut
1/2 teaspoon salt


Pre-heat oven to 375 degrees.  Cream butter and sugars  until light and fluffy.  Beat in egg.  Add milk, vanilla and guava nectar.  Mix until well-combined.  Combine all dry ingredients and mix to incorporate.  Add in thirds to butter and sugar until mixed in.  Turn dough onto floured surface and roll to 1/4 inch thickness.  Use  whatever cookie cutter or biscuit cutter you like to form shapes.  Bake for 8-10 minutes.  Transfer to cooling rack.  Will make roughly 2 1/2 dozen 2-inch cookies.  


*You could probably use flake coconut, though I never have.  I like the desiccated coconut because it gives it a tiny bit of crunch.  You can also sprinkle sugar on top of the cookies before baking.  These will puff up considerably because of the cream of tartar, so unless you want little cookie pillows, do be sure to roll the dough out to 1/4 inch.  


Monday, September 5, 2011

I Did Say...

...I'd share photos if I made that peach cake I mentioned in my last post.  I most certainly did make that cake, 100+ degrees be damned.  Once again, the people I work with win big time, because they get the end results more times than not.  I can only imagine the amount of weight I would gain if I kept it all at home.  I am thankful for a group of appreciative guinea pigs for what comes out of the kitchen.

I don't know how much baking will get done this week.  The work schedule is going to be a crazy one, but I just finished reading Susan Herrmann Loomis' 'On Rue Tatin' and  copied two recipes from it.  No surprise that both are for cakes.

The house is smelling fabulous at the moment.  I'm making vegetable stock...just because.  Actually, I brought home two very large spaghetti squash from a friend's garden this past week and I'm going to try making a soup with one of them, hence the stock.  I also brought  home a large handful of cherry tomatoes.  I had come across this recipe on the Food 52 site (one of my new go-to spots on the 'net).  Candied tomatoes...just that was enough to pique my curiosity.  I didn't make the whole recipe because well...no good reason other than it was late.  I will try it soon.  But I will say the tomatoes are delicious.  I also made a sweet onion marmalade-ish condiment.  Seriously, I need to entertain.  I make all these nosh-y little items that just beg for a bottle of wine and good conversation to go along with this food.

Who's in?


Saturday, August 27, 2011

It's Too Darn Hot...

...to be cooking this week.  I've seen the temperature inch up to 108 degrees for the past two days and it doesn't look as though it's going to get any better until the middle of next week.  So, I have discovered that I can easily live on antipasti platters....for multiple days in a row and multiple times in one day.  The most daring that I've been in the kitchen over the past few days has been making more ricotta (I am obsessed.) and pasta.  Believe me, it's not for lack of desire.  I found a recipe for a peach cake that I am dying to make.  I bought peaches the other night, but cannot bring myself to turn on the oven.  I may just say 'to hell with it' and turn the oven on tomorrow, with desire for peach cake winning out over the need to stay cool.  Perhaps a morning baking session?  I'll share the results.

But all has not been at a standstill in the household.  Some of you may know that I've been considering starting a food -based business.  I've spent quite a bit of time trying to answer the 'What do you want to be when you grow up?' question and I find myself coming back to food.  I went out with a friend last weekend and batting ideas back and forth finally narrowed my vision.  Then I went to a dinner party at another friend's house earlier this week and in talking with her brother, who told me repeatedly to 'follow my dreams,' it began to sink in.  As did the advice of not waiting for the 'right time' because there is no 'right time' and if I wait, I'll never do it.

I took a step forward on Wednesday.  I am going to learn everything I need to start this baby.  I'm going to write a business plan, find out what licenses and certifications I need, marketing....you name it.  I don't expect it to be easy.  But it's high time I take a jump into this world and try something new and big and scary.  What I have now isn't too much, but it's a beginning.  I'm calling it the front door.  Over time, the door will inch open little by little as my plan rounds out.  Let me introduce you to my new venture...hell, my new ADventure:

Semplice Gourmet

....and because the weekend just screams for some old school sounds....have a little Ella with your morning coffee:


Thursday, August 18, 2011

It's a Science...


...baking, that is.  Exact measurements, ideal conditions...all hopefully leading to a gorgeous, crusty on the outside, light and airy on the inside loaf of bread to come out of the oven.  Have I mentioned that I was never a fan of science in school?  I was a much bigger fan of literature and art.  Maybe that's why I still haven't baked a loaf of bread that I've been totally happy with.  Sure, there's that photo of a nice looking boule I made last year in the header of this blog (right up there!).  I can do pretty darn well with scones, cookies, cupcakes, muffins and cakes.  But bread....bread is elusive to me.

I had such high hopes for today's attempt.  Armed with a brand new bag of flour, I was determined to knock it out of the park.  Greek Olive Bread....how could it go wrong?  It would have one of my absolutely favourite things in it....oil-cured olives.  Wrinkly, briny, oily and oh-so-good.  Half an onion.  I imaged the crust snapping loudly when I put a blade to it, still steaming from the oven heat.  Slathered in butter...it would be beyond delicious.

My first hint that something was amiss was how hard it was to knead.  Not just because I was trying to incorporate both the olives and chopped onions; it was unyielding, fighting my hands at every turn.  I managed to get it to a point where I thought it was acceptable to let it rise.  Fast-forward an hour and a half.  I looked into the plastic wrap-covered bowl.  It wasn't pretty.  But it rose, so I thought...well, maybe it won't be too bad.  Usually after its risen, it's malleable enough to give it a good punch or two and I can knead it a bit more.  Nope.  Not this time.  Barely was I able to work my fingers through the dough again.  I managed to make two slightly larger than softball sized loaves and let them bake away for 40 minutes.  They baked to a lovely golden brown, speckled with olives.  I even tapped one and heard the hollow thump that recipes say you'll hear.  When I cut one of the loaves open, it wasn't light and airy.  It was doughy and a bit dense.  It's not bad...it's just not good.  I'm tempted to take the one I haven't sliced and bat it around.  Or, had I thought about it, I could have made them golf-ball sized.  Then I'd be able to pack them into a big ole Ziploc bag, grab my golf clubs, head over to the driving range and whack the crap out of them.  Hell, at least my swing would get some practice.

I will perfect this bread-baking skill.  I didn't buy a 10-lb bag of flour for nothing.
That's them.  Not too pretty.

Eliopsomo/Olive Bread
From Modern Greek:  170 Contemporary Recipes from the Mediterranean by Andy Harris

Happily, if you want to try it yourself, you can find the recipe in Google Books.


Sunday, August 14, 2011

South of the Border

...down Mexico way...thanks, Frank...but we're going a little further South to El Salvador.  I love discovering new foods that I've never heard of.  So many cultures, so much food to try.  While I may not like it all, I'm willing to give it a go.

I love finding new food websites out there in the world wide interwebz.  If you have a chance, do check out Food52.  Recipes, contests, shopping, and more are here.  I first discovered it when they were having their Best Gluten Free recipe contest and came across the recipe for Salvadoran quesadillas.  Posted by Sasha at Global Table Adventure, they looked amazing and delicious.  You also need to check out Sasha's website.  Her goal is to cook foods from 195 countries in 195 weeks, a daunting adventure that I am not soon to take up.  You will also easily get sucked into her site and find loads of recipes you'll want to make yourself.

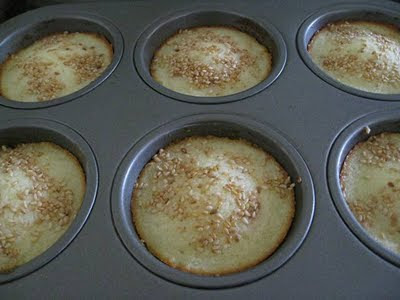
These little goodies are not what you think of when 'quesadilla' comes to mind.  Instead of tortillas sandwiched with cheese and other fillings, they're little cakes full of butter.  Dense, cheesy, and a little nutty with sesame.  Sasha says they're eaten for breakfast in El Salvador.  I made them for brunch this morning and had one later in the day as a snack.  It will be difficult to not eat the whole batch at breakfast.  I'm looking at the leftovers now thinking 'just one more.'  But I'll be good....and wait for tomorrow morning.  Just me, a big steaming cup of coffee and those four little cakes.

Salvadoran Quesadillas
(Adapted from Global Table Adventure's recipe)
Makes 8

1/2 cup rice flour
1/2 teaspoon baking powder
Pinch salt
1/2 cup butter
1/2 cup sugar
1 egg
1/2 cup plain yogurt
1/4 cup grated Parmesan cheese
Sesame seeds, for sprinkling

Pre-heat oven to 350 degrees and grease muffin tin.  In a small bowl, combine the rice flour, baking powder and salt.  Set aside.  In larger bowl, cream the butter and sugar until light.  Add egg and mix well.  Add yogurt, cheese and flour mixture and mix well.  Spoon batter into muffin tin about half-way in each well.  Sprinkle with sesame seeds to taste.  Bake for 15-20 minutes.  The edges will be golden brown.  Let cool for about 10 minutes before removing from pan.

If you checked out the recipe on Sasha's site, you'll notice that I substituted both the cotija cheese and sour cream.  I plan to make these again with all the ingredients she used, but I don't think I missed out much by substituting.