Pages

Monday, December 31, 2012

A Small Bite Before the New Year

This is it...the last day of 2012.  The morning started off on an odd note...there was a weird power surge on my block.  Everything powered down and right back up and you could hear...something.  Don't ask me what caused it, because I have no idea.  I went outside this morning, saw my next door neighbour and asked him if he had the problem too...just to make sure it wasn't only me.  It seems only fitting...an odd occurrence for an odd year.

But it's time to move on and count down the few hours that remain until 2013 arrives here.  New Year's for me is still based on East Coast time, so I'll have my glass of cava at 9pm, watch the ball drop in Times Square, and most likely be in bed before it's midnight in Los Angeles.  Go ahead, say it...I really know how to party.

It's going to be a quiet night.  I'm still debating on what to make for dinner.  There's an excellent chance that dinner will be lots of nibbles.  A carryover from my last life...where my partner and I usually stayed in on New Year's Eve and had a table full of small bites, antipasto, and hors d'oeuvres the we grazed on over the span of the evening.

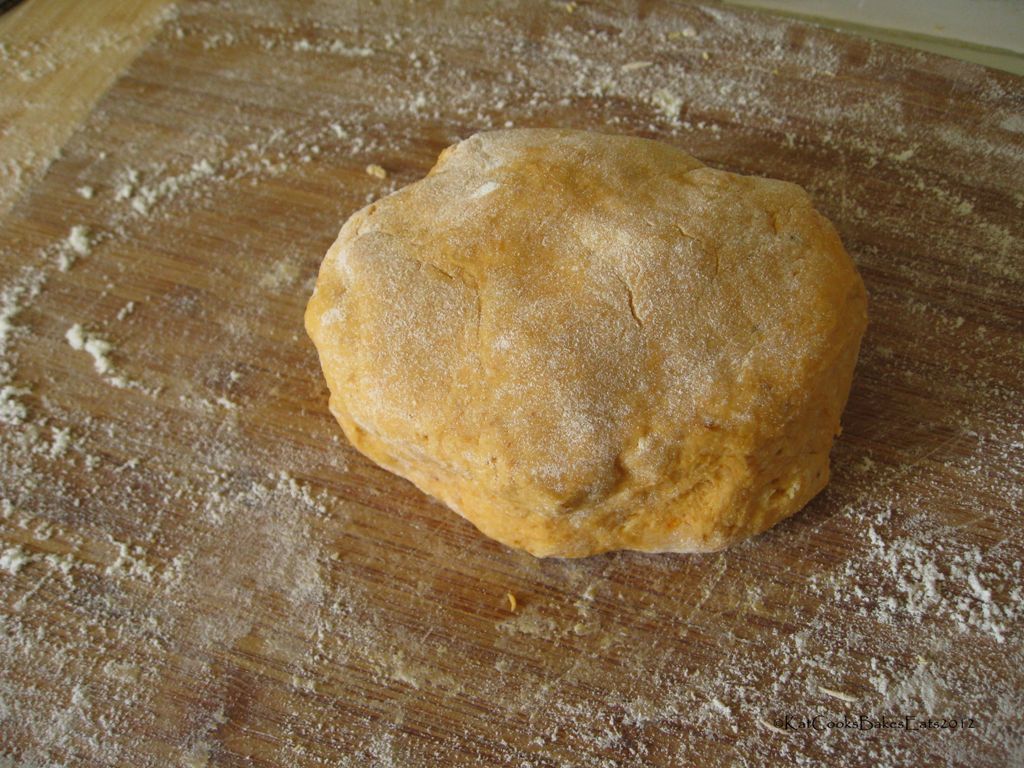
I have eggplant dip in the fridge, fresh ricotta I made the other day, and wine biscuits on the counter.  With as many times as I've made them, I'm surprised I haven't really mentioned them more on here.  One of my BFF's asked me to make wine biscuits for the birthday party she threw herself yesterday.  I had them ready last Thursday, but since I can't have them sitting around without being continually tempted, I made more yesterday afternoon before the party.  I replaced the ones I ate over the past couple of days, added a few more, and kept a little for myself.  They really are amazing little cracker-like biscuits and a perfect project if you have the remains of a bottle of wine sitting around.  For some of you, that may not happen, but when I open a bottle of red, I usually spare the half cup required for this recipe.  I've been meaning to try them with white wine, but haven't gotten around to it yet.

This recipe comes thanks to the wonderful King Arthur Flour Baker's Companion (I also think they have the recipe posted on their website).  I've done a little adapting, making them more savoury than sweet.  I use a lot of black pepper in them, loving the bite it gives them.  They pair fabulously with ricotta, drizzled with a little olive oil, scatter them onto a cheese plate, or do what I do...eat them by the handful on their own.

Happy New Year, everyone...I wish you all an amazing, successful, and prosperous year!

Wine Biscuits
Adapted from the King Arthur Baker's Companion

2 1/2 cups flour
2 teaspoons baking powder
1 teaspoon salt
4-6 teaspoons sugar (I use 4, if you want them sweeter, use more)
2 teaspoons black pepper (I use about 3 tsp)
1/2 cup + 2 tablespoons red wine
1/4 cup olive oil (or vegetable oil)

Whisk the olive oil and wine together.  In a mixing bowl, add the dry ingredients, then mix in the wine and oil.  I mix it by hand, but you can use a mixer.  Bring your dough together, then chill for at least an hour.

Pre-heat oven to 350 degrees.  Split the dough into three pieces.  Roll out each piece and cut out biscuits with a 1 1/2 inch biscuit cutter.  You can also use a larger size if you want.  Place biscuits on a parchment lined baking sheet.  Bake for 25 minutes, about 30-35 minutes if you make them larger.  


Thursday, December 27, 2012

Out of Sorts...

...I know, I know...it's been a few weeks since I posted. Here we are nearing the end of yet another holiday season and soon we'll be saying 'hello' to a new year. Another Christmas season and I wasn't in much of a holiday mood. The past few months of not having a job, coupled with the holidays, just kept me in a down mood. Some days, very down. I did end up finding a full time job (albeit, temporary) and a part-time job (also temporary), both in retail. While I'm thankful for both, it's not alleviated the constant knot of worry and anxiety in my stomach, since both jobs pay close to only half of what I was making earlier this year. I listen to all the news reports about the country about to go over the fiscal cliff as I stand precipitously at the edge of my own, trying to scrape together the money to pay rent.

 It's made me think about the service industry, one of the fastest growing sectors and one of the poorest paid. Living on minimum wage or just above is not easy. Low pay, no benefits, and you're expected to put a smile on your face and sell, sell, sell. Someone said to me recently that working in retail is corrosive to the soul. Not a bad way to put it. For the sake of my soul...it's time to get out.

 Why am I sharing this? I tend to throw up a lot of smoke and mirrors around myself to keep how I feel and what I'm going through close to the breast. But ultimately, how I feel affects what I cook, how I cook, and even whether or not I cook. For the past couple of months, I've done very little cooking and baking. A lot of what I cooked I put in the 'baby food' category. It was a need for comfort food. Think mush...grits, polenta, rice...and that's if I decided to turn on the burners. There were a lot of sandwiches in there too. And there were a lot of days when eating was just an afterthought because I needed an energy intake. I did bake for the holidays, though not nearly as extensively as I have in the past. But it's my way of showing love and appreciation to my friends and family...and those brief times made me feel better.

 So today I pushed myself to start the break-out...out of my mood, my depression, my cloudy day, and my unfocused mind. I started small; I roasted a couple of eggplants the other day and made an eggplant and roasted red pepper dip, which led to making ricotta, then digging in the fridge and finding carrots and cauliflower, which became a roasted carrot soup. Pita bread became Parmesan-black pepper pita chips to go with the soup. Tonight I will make wine biscuits from the dough I made this morning. This is the most action my kitchen has seen since before Thanksgiving.

 Now it's up to me to keep the black clouds and cold at bay, with the warmth and glow from the oven. Let's bring 2012 to a close, welcome 2013 with open arms, and seek the opportunities a new year brings.

  Roasted Carrot Soup 

 1 lb carrots, peeled and cut into large chunks 
2 cups cauliflower florets 
1/2 medium onion, sliced 
2 tbsp olive oil 
4 cups chicken or vegetable stock 
1/4 cup heavy cream
 salt pepper 

 Pre-heat oven to 400 degrees. In a large casserole dish, toss carrots, onions, and cauliflower with olive oil. Sprinkle with a little kosher salt and pepper. Roast until tender, about 35-40 minutes. 

 Transfer vegetables to a stock pot and add the chicken stock. Heat until stock is simmering. Turn off heat and with an immersion blender or regular blender, puree vegetables. Add heavy cream and blend to incorporate. Salt to taste.


Bourbon Pecan Truffles

Cranberry Pecan Shortbread

Double Chocolate Marcona Almond Biscotti

Wednesday, November 28, 2012

Panera Bread...and More

I was recently given the opportunity to have lunch at my local Panera Bakery Cafe to try one of their newly developed soups.  I've been going to Panera for a few years now, as it's one of my go-to spots when one of my BFF's and myself get together for lunch.

I went on a late afternoon, after the always busy lunch rush.  Panera has a 'You Pick 2' option that includes a cup of soup and a half of any of their cafe sandwiches.  I chose the Sonoma Chicken Stew and paired it with the Turkey Asiago sandwich.  While I waited for my order to arrive, I enjoyed one of the perks of living in Los Angeles.  Invariably, wherever you go, one of the many conversations you will overhear includes 'the industry.'  At the next table over, I eavesdropped on two young couples discussing where they should go to shoot the next scene in their movie.  After a few minutes of discussion, they all agreed it could be done at one of their apartments.  Be sure to look out for this next blockbuster.

My meal arrived and I went right to the soup.  The Sonoma Chicken Stew has a very flavorful creamy base full of shredded chicken, peas, carrots, and potatoes.  I have to tell you, I was amazed at the carrots.  They looked like little marbles.  I visited the Panera website and discovered that those carrots are called Thumbelina carrots.  You learn something new every day!  The soup also had a slight sweetness to it that I learned was due to the sweet cream added to it.  It was an unusual addition, but one that lent itself to the sweetness of the carrots.  The half sandwich made it a perfect size for lunch or a light dinner.  The Asiago focaccia is delicious, aged and smoky in all the right places.

On any given day, Panera serves six different soups from the Sonoma Chicken Stew to French Onion to Vegetarian Creamy Tomato and more.  You can check out their website to see the daily options, download their menu, or check out the short videos they have on the soups.


[Disclosure:  This is a sponsored post that includes product and/or monetary compensation.   This is my first sponsored post and I chose to do it because, as I stated above, I have been eating at Panera Bakery Cafe for years and would not recommend the restaurant and/or their food if I didn't feel the product deserves recognition.]

Thursday, November 22, 2012

'Tis the Season, Part Two

[Note:  I started writing this post yesterday, hence the 'Thanksgiving Eve' mention.  I'm letting it be.  To everyone out there...Have a beautiful Thanksgiving, full of too  much food and thankful to be surrounded by family and friends.]

 Here we are on Thanksgiving Eve where people are busy preparing for one of the biggest eating holidays of the year, if not the biggest.  The good china is coming out for the table, people are fighting the craziness of the grocery stores, and kitchens are Command Central for the festivities.

I am not making dinner for Thanksgiving, but I am responsible for bringing appetizers for thirteen, which is an infinitely easier task than dinner.  There's a good chance that during this holiday season, I will make a turkey breast so I can have my own cache of leftovers and make stock.  But before any of that happens, let's go back a couple of weeks to my last post.  It was all about the pumpkin and I warned you that there would probably be another pumpkin post because I still had pumpkin to use.  This is that post.

I made gnocchi once before and for a first attempt it was a little disappointing.  They were heavy little lumps of dough that tasted okay, but beyond that...well, I wasn't happy.  So this time around, instead of using regular all purpose flour I used '00' flour.  A much better choice.  They were hearty without being heavy.  Serving pumpkin gnocchi in a brown butter and sage sauce?  The best choice.

Pumpkin Gnocchi in Brown Butter and Sage Sauce
(Adapted from this recipe)
Serves 2-4

1/2 cup pumpkin puree
2 cups '00' flour  (plus extra for rolling out)
1 egg
1/2 tsp nutmeg
1/4 tsp salt
1/4 tsp pepper
3 Tbsp butter
2 Tbsp sage, chopped

In a bowl, mix the pumpkin, flour, egg, nutmeg, salt and pepper.  With a fork, bring all the ingredients together to give you a sticky, but not overly wet dough.  Add a little more flour by the tablespoon if you need to.  

Working in small portion, roll each piece of dough out into a hotdog shaped log, about 12 inches long.  With a knife or dough scraper, cut the dough into little pillow shapes about and inch long.  On the cut side, press down with the tines of a fork to form ridges and give you that slightly oval shape.  Spread gnocchi on a flour dusted pan until you work through all your dough.

In a pot, bring salted water to a boil and add enough gnocchi, but don't crowd the pot.  The gnocchi will cook within 3-5 minutes and they'll float to the top when they're done.  In a skillet, add the butter and melt over medium high heat.  Allow it to foam and begin to brown.  When little brown bits form and it smells nutty, add the sage.  Let the sage crisp for about 20 seconds, turn off the heat then add the gnocchi.  Mix to coat the pasta and serve.


Wednesday, November 7, 2012

'Tis the Season

No, no...don't worry...the tree isn't up, the ornaments and lights are still in their boxes, and there isn't a strip of tinsel to be found anywhere here yet.  It's coming though, faster than you may think.  Thanksgiving is a mere two weeks away and I had already seen the Christmas decorations vying for space right next to the Halloween candy and costumes at Target.  I'm talking about that other indicator of the season, whether you call it the Fall Season or the Thanksgiving Season...I'm talking about pumpkin.

All over the internet, on Pinterest, and in the blogs I read, I've seen recipes with pumpkin--pumpkin roll, pumpkin donut holes, spiced pumpkin muffins, pumpkin- filled ravioli, the traditional pumpkin pie and loads more.  The Pumpkin Spice Latte has been back at Starbucks for at least a month.  So I decided to throw my hat into the ring and submit my take on a pumpkin something or other.  My pumpkin treat for today is pumpkin biscotti, because in my world, there is no such thing as too much biscotti.  I have to give this one to Kenny, lover of all things pumpkin, for giving me the idea to make these.  I definitely owe him a dozen of these cookies.

Being a relative newcomer to the Pumpkin Appreciation Society, I'm impressed with all the ways you can use pumpkin in recipes.  A word of warning, I still have pumpkin puree to use, so sooner rather than later, you just might see another pumpkin recipe here.  But for now, sit down with a cup of coffee, gather your energy for the upcoming hustle and bustle of the holidays, and have a cookie or two.

Pumpkin Biscotti
Adapted from Alice Waters' Anise Almond Biscotti recipe
Makes about 36-40 cookies

2 1/2 cups flour
1 tsp baking powder
2 tsp cinnamon
3 eggs, room temperature
1 cup sugar
1/2 cup pumpkin 

Pre-heat oven to 375 degrees and line a baking sheet with parchment.  In a small bowl, add the flour, baking powder, and cinnamon.  Whisk to mix well.  In another bowl, add the sugar and eggs.  With either a whisk or electric mixer, whisk until pale yellow in colour and light in texture.  Add in the pumpkin and mix well.  Gradually add the flour mixture and stir to combine.  When the dough is mixed, turn out onto a floured board and split into two portions.  Form each portion into a loaf about 12-14 inches long and 2 to 3 inches wide.  Place about 3 inches apart on the cookie sheet and bake for 25 minutes or until bottoms are golden brown.
  
Remove from oven and let cool for 10 minutes.  Turn oven temperature down to 300 degrees.  Cut loaves into half inch slices and place face down on the cookie sheet.  Leave a little space in between each cookie.  (You may end up needing another cookie sheet for this or doing this in two steps.)  Bake again for another 25-30 minutes, turning the cookies over half way through the baking time.  Remove and cool on baking sheet.  


Thursday, November 1, 2012

Midnight Baking Session #852

There is something really appealing about objects miniaturized.  I loved all the furniture in my dollhouse when I was a little girl.  Every item was just like what we had in the house...just so much smaller.  Did you ever know someone who set up toy trains with the tracks running through a tiny little village?  All the little trees, the general store, the school house, the little people.  The cute factor is so big, it makes me grind my teeth, because it is all so cute and...All.  So.  Tiny.  WAIT!  Hold everything...you have to see a shop on Etsy that is beyond cool...everything oh so tiny and more than itty bitty!  See???  Try not to grind your teeth, I dare you!

Think of all the foods you can find in miniature.  Candy bars, you know, 'fun' size bars.  Hamburgers, shrink them down and call them sliders.  Reese's peanut butter cups in tiny, baby form.  Lasagna cupcakes and soup served in shot glasses.  And desserts...lots of desserts.  I think it makes them more palatable, and not just in taste.  Eat a mini fruit tart and have all the indulgence with a quarter of the guilt.

Back in May, I baked mini cupcakes for a baby shower.   A couple of weeks ago I made mini scones, and last night just shy of midnight, I found myself in the kitchen with an itch to bake.  Earlier that morning I made pear sauce from an Asian pear I had in the fruit bowl, and while I would have been just as happy eating it as is, I thought using it as part of something else would be even better.

If you still get your Sunday paper, chances are you also get the Parade magazine.  In the 7 October issue, they featured a basic muffin recipe that looked like a good place to start for what I wanted to make.  They also give  you a load of suggestions for add-ins.  Originally, I was going to make regular sized muffins until I remembered that I bought little condiment cups and had a mini muffin pan that had to be christened on a first use.  And so came the Asian pear almond mini muffins.  There is one problem with making baked goods in mini form though.  It's difficult to eat just one.

Asian Pear Almond Mini Muffins
Adapted from the Basic Breakfast Muffins recipe from Parade
(Makes 24-28 mini or 12 regular muffins)

2 cups flour
1 tbsp baking powder
1/4 cup sugar
3/4 tsp salt
2 eggs
1 cup milk
1/2 cup canola oil
1 tsp vanilla 
1 tsp cinnamon
1 cup Asian pear sauce
1/2 cup sliced almonds, toasted

Pre-heat oven to 400 degrees.  In a small bowl, whisk together the milk, eggs, oil, and vanilla.  In a larger bowl, mix the flour, baking powder, sugar, and salt.  Whisk the wet ingredients into the dry, mixing well to beat out any lumps.  Add the pear sauce and mix to combine.  Finally, add the almonds and mix to incorporate.  

Line a muffin tin with liners or grease the pan with butter.  Fill each spot about 2/3 full of batter.  If you're making mini muffins, bake for 15-16 minutes;  18-20 minutes for regular sized.  

Note:  To make the pear sauce, slice and cube a large Asian pear.  Add the pear, with 1/4 cup sugar, and 1/2 cup water to a saucepan.  Bring to a boil and with a potato masher, smash the fruit, and allow the sauce to thicken.  I added about 1/2 teaspoon of nutmeg to it, cinnamon would also be good.  


Yes, the bottoms got a little too done.  That's what can happen with a new pan and a minute too long!

Monday, October 15, 2012

On a Perfect Fall Evening...

...the sky was a swirl of grey and clouds, the ground still damp from the rain that took all day to arrive and, best of all, a definite chill in the air.  To say that it was relief would be an understatement.  I was beyond tired of the 100+ degree weather Los Angeles had been living with for weeks.

It would be foolish not to take advantage of the weather.  This was a night that called to be wrapped up in warmth.  Wrapped in warmth like a tawny blanket, heavy as cream, and a cup of ginger-spiked tea in your hands.  A blanket that, strangely enough, looked like a bowl soup.

One of my BFF's introduced me to mirin a week ago, when I had this amazing Asian avocado salsa at her house.  It took me all of three days to find myself at the grocery store with a bottle of mirin in hand.  It would undoubtedly be in that soup, along with the butternut squash and cauliflower that I had.  To add a little more of an Asian twist to the soup, ginger would go in too.  I made toasted sesame oil 'breadsticks' with a day old baguette to serve alongside.  [Cut, toss in a skillet with the oil, and toast.]  I am mad for toasted sesame oil as I also used it to make the 'croutons' on top of the soup.  Those are actually grits that I made, poured in a loaf pan, and chilled until firm.  So easy to slice and throw in a pan with the oil, but be warned, those grits will sputter!  It's worth it though.  They're crunchy on the outside and chewy on the inside.

There will be more chilly, rainy evenings to come.  This is an easier blanket to make, than say, knitting one.  I can guarantee it will taste better.


Gingered Butternut Cauliflower Soup
Makes enough for 4 generous servings

2 cups butternut squash, cubed
4 cups cauliflower
¼ tsp ground ginger
2 tbsp olive oil
1 tbsp toasted sesame oil
1 tbsp butter
4 cups chicken or vegetable stock
¼ cup mirin
1 tsp grated ginger
1 leek, sliced (white and light green parts)
¼ cup heavy cream
Salt
Cilantro, for garnish
Croutons, for garnish

Pre-heat oven to 350 degrees.  In a bowl, toss the cauliflower and squash with the ground ginger, a tablespoon of the olive oil, and sesame oil.  Place in a baking dish and roast until tender, 25-30 minutes. 

In a stock pot over medium heat, warm the remaining olive oil and butter until melted, add the leeks and cook until translucent, about 5-7 minutes.  Add the grated ginger and stir.  Mix in the squash, cauliflower, stock, a pinch of salt, and mirin.  Stir.  Allow to simmer for 20 minutes.  With an immersion blender or regular blender, blend until smooth.  Add the cream and blend until mingled.  Garnish with cilantro and croutons.


Saturday, October 13, 2012

A Little Indian...

How often have I mentioned here that I love Indian food?  I don't think I have at all.  That is an oversight that we can clear up right now.  I love Indian food.  Before my friends, Cathy and Mike, moved to Austin, there was a great place in Pasadena we used to go to.  Please don't ask me what the name of the restaurant is.  For someone who prides herself on always remembering names and other pertinent bits of information, for the life of me, I don't know what it's called.  I can tell you where it is.  I can tell you that it's on the second floor in the little group of shops it's with.  I can tell you that everyone who works there that I've encountered has been lovely and helpful.  And I can tell you that all the food I've eaten there is delicious.  But the name?  A blank.

I have an Indian grocers a 10 minute drive away.  I love going there.  Spices, sweets, snacks, and so many other things you can't find just anywhere.  They have a cafeteria next door where I had the most amazing pumpkin curry a few years ago.  I've been there right before Diwali when they have tables laden with dozens of sweets in bright pinks and pistachio greens and I've wanted to try every single one. But I have not really attempted cooking Indian food at home.  I bought a curry mix from them and made it once, but to me, that's like the American equivalent of buying a box of Shake n' Bake and saying you made fried chicken.

I was cruising Pinterest  a week or so ago, and someone pinned a recipe for palak paneer.  Damn, that sounded good!  I hadn't had it in a couple of years.  The recipe seemed pretty easy and I always have spinach in the fridge.  Hmmm...I should also tell you that I discovered this wonderful blog called Crave Cook Click by Anita Mokashi.  She posted a recipe for Ukadiche Modak that really got my attention.  Little sweet dumplings.  Little parcels filled with coconut and jaggery.  What??  Exactly!  I needed jaggery and paneer.  Life would not be complete until I had both.  You see, when I get an idea (or two) in my head, it swerves into obsession where I cannot let it go.  So I went.  I bought paneer.  I bought a 2.2 lb hunk of jaggery.  I also came home with black sesame seeds and caraway seeds (yes, plans for the near future).

Palak Paneer has a lot of spices in it, but my results weren't too spicy.  I probably could have taken it up a notch and next time I will, but I was happy with my first attempt.  I made a few substitutions in the recipe I was following, but if you listen to anything I say, listen to this:  Don't leave out the garam masala!  I truly believe this is what takes this recipe from good to beyond!  This recipe also has tomato in it, which if I'm not mistaken, isn't typical.  But I like it here a lot.

More Indian food is on the horizon.  You know I'll share the Ukadiche Modak experience and plenty more.

Palak Paneer (Saag Paneer)
(Adapted from a recipe by US Masala)

4 cups spinach, packed
1 1/2 cups paneer, cubed
2 tsp cumin
1/2 tsp fennel, ground
3 tbsp olive oil
1 large onion, grated
1 clove garlic, smashed 
1/2 teaspoon ginger, grated
1 medium tomato, chopped
1/2 tsp sugar
1 tsp garam masala
1 tsp coriander
1 tsp chili powder
1 cup milk


Cook spinach in a pan with a cup of water and the sugar for 6-7 minutes.  Drain water, and pulse spinach in food processor once or twice.  You want it really finely chopped, but not pureed.  Heat the olive oil in a skillet over medium high heat.  Add the ground fennel, one teaspoon of cumin and the onion.  Cook for 3-4 minutes until onions are translucent.  Add the ginger and garlic, mix and cook for another 4-5 minutes.  Add the tomato with 1/4 cup of water, the other teaspoon of cumin, coriander, and the chili power.  Mix and add the spinach and milk and let cook for 5-6 minutes.  Stir frequently.

In another pan, heat one tablespoon of olive oil and the paneer cubes.  Turn the paneer frequently to brown evenly on all sides.  Remove from pan and let drain on a papertowel-lined plate.    

Add paneer and garam masala to skillet.  Lower heat and let everything simmer for another 6-7 minutes.

Serve with naan, or as I did, with pita on the side.


Thursday, October 11, 2012

A Little Italian

The closest I've come to eating at Mozza (the Nancy Silverton, Mario Batali, and Joe Bastianich-owned Los Angeles restaurant and pizzeria) was an almost-made reservation four or five years ago, not long after they opened.  I remember my ex telling me that the earliest reservation available was an 11pm opening, and that was the last I heard of it.  I don't think the ex was interested in the late hour, so it never came to fruition.

I've driven by countless times as the restaurants sit conveniently near the corner of Melrose and Highland.  Someday I'd still like to go.  I don't think I've once heard anything bad about it, but I'll have to wait until the level of disposable income I have increases a hundred-fold.

So in the meantime, I'll have to bring a little bit of Mozza my way via the library.  Once again I was perusing the cooking section at my local branch of the Los Angeles Public Library, and spotted The Mozza Cookbook by Nancy Silverton, Matt Molina, and Carolynn Carreno.  With all the times I've looked at those shelves, I don't know how I missed it.  I almost didn't check it out because I have three or four other cookbooks checked out, but I thought, 'what the hell?....what's one more?'

I've got a few recipes flagged to try before the book needs to be returned and there is a good chance it will also have to be a purchase at some time in the future.  Initially,  I flipped through the cookbook and saw a few recipes that looked interesting, then a night came when I settled in and starting flipping through the 'Dolci' section.  That's what sold me.  I have both the Toasted Coconut and Toasted Walnut Biscotti recipes earmarked and can't wait to give the Rosemary Olive Oil cake a try.  Oh...and I think the Olive Oil Gelato they serve at Mozza is justification enough for me to get myself a seat there.

The first recipe I made from the book wasn't dessert though.  It was the Eggplant Caponata.  I had two eggplants that needed to be used in something and realizing that I had everything I needed (or suitable substitutions), the caponata called to me.    It can be a part of an antipasti plate or as a chunky sauce with pasta.  Make some fresh ricotta and when you make crostini with the cheese and caponata you will thank me.

Eggplant Caponata
(Adapted from The Mozza Cookbook by Nancy Silverton)
Makes about 4 cups

5 cups eggplant, cut into 1-inch cubes
1 tsp kosher salt
1/4 tsp black pepper
1/2 cup olive oil
3/4 cup onion, diced
2 garlic cloves, sliced
2 tbsp raisins (or currants)
1/4 tsp red pepper flakes
1 oz. balsamic vinegar
1/2 cup diced tomatoes with juice
1 tsp fresh thyme (or 1/2 tsp dried thyme)
1/2 tsp sugar

In a bowl, toss the eggplant with the salt and set aside.  Heat 1/4 cup of the olive oil in a skillet over medium high heat and when the oil is near smoking, add the eggplant.  Let the eggplant cook for about 2 minutes without stirring.  The eggplant will begin to brown and cook down.  After a couple of minutes, stir the eggplant, add a couple more tablespoons of the olive oil and continue to cook for another 5-6 minutes.  Add any remaining olive oil and cook the eggplant until it is all browned.

Once browned, remove the eggplant with a slotted spatula and place on a plate.  Lower the heat and add the onion.  Stir constantly to cook the onion, until translucent, and de-glaze the pan, about 3 minutes.  Add the garlic, raisins, and red pepper flakes and cook for a minute or two.  Add the tomatoes, balsamic vinegar, thyme, and sugar.  Stir to combine and add the eggplant back into the pan.  Mix well and cover, allowing to cook for five minutes.  Remove the lid and cook for another 5 minutes, allowing the remaining liquid to cook down.

You can eat the caponata warm or let it come to room temperature.  Either way, it's delicious.


Tuesday, October 9, 2012

A Little Celebration


We celebrate birthdays, getting an A on a final, graduations, new jobs, and new relationships.  We will seek out reasons to celebrate because it makes us feel good.  A little acknowledgement, a little validation, a little joy.

There are a couple of accomplishments to celebrate here.  No, I can't tell you that I have a new job yet.  Hopefully soon.  But what I can tell you is that this post is Number 100.  That's right.  The big One-Oh-Oh.  I know, I know...I could have reached the marker a little sooner if I posted more often, but you know what they say...good things come to those who wait.  And I've got a lot of patience.

Another accomplishment from the past two weeks was writing the recipes for the weekly newsletter of FarmBoxLA.  FarmBoxLA has built relationships with a couple dozen farms in the area and will source seasonal fruits and vegetables from them on a weekly basis, which will then be delivered to you at the beginning of each week.  I heard from them about three weeks after I responded to an ad they placed looking for food writers.  A few emails and a couple of phone calls later, I met Reisha at the Santa Monica Farmers Market and we did a little shopping.  I came home with a bag of goodies and a five recipes goal.  Those recipes were featured in the September 30 Newsletter or via the 'Our Kitchen' link on their site.  I had a lot of fun writing for them and hope I will again.

So, I waited to write post one hundred because I was busy for a couple of days with the FarmBoxLA assignment, but also because I wanted to make something special.  Sure...I could have baked another cake.   But why bake a cake when you can make struffoli?  Don't know what struffoli are?  Let me tell you.  Other than being my favourite dessert ever, this Italian treat is little bits of dough that are fried and then coated in a honey syrup.  Struffoli is usually made around Christmas and my strongest memory of them is my Aunt Placida bringing over a huge platter of struffoli a couple of days after Christmas in 1979 after I had come home from the hospital after an overnight stay.

Proust had his madeleine, I had my struffoli.  Despite having struffoli once or twice since that day in 1979, the first bite I took after making them transported me back to my parents' kitchen, sitting at the table and biting into a crunchy bit of dough and candy sprinkles, my fingers sticky with honey.

It was the perfect way to celebrate being home from the hospital, hanging out with my family, and now...celebrating one hundred.

Struffoli
(From The Italian Cookbook by the Culinary Arts Institute)

2 cups sifted flour
1/4 tsp salt
3 eggs
1/2 tsp vanilla extract
1 cup honey
1 tbsp sugar
1/2 tsp cinnamon
1 tbsp candy sprinkles
oil for frying (I used sunflower)

In a skillet over low heat, mix the honey, sugar, and cinnamon.  Stir and let the sugar dissolve.  Once warm and all ingredients are combined, turn off heat and set aside.

In a large bowl, add the flour and salt.  Making a well in the center of the flour, add eggs, one at a time, loosely mixing with a fork after each addition.  Add the vanilla with the last egg.  

After mixing well to form a soft dough, turn onto a floured board, knead for 5 minutes and divide dough in half.  Roll each half until about 1/4 inch thick.  Slice into narrow strips, then cut strips into little pieces about 1/2 to 3/4 inch long.  You can also roll the strips before cutting them to get little tubes or spheres.  

In a saucepan, add the oil and heat.  When the oil is hot enough, add only enough dough pieces so you're not crowding the pan.  Let fry until lightly golden brown.  Remove with a slotted spoon and place onto a papertowel-lined plate to drain any excess oil.  

Once you've fried all the dough, add to the honey mixture and mix thoroughly so each piece is coated with the honey syrup.  Spoon onto platter and add sprinkles.


Monday, September 17, 2012

From Those Who Know

You may or may not know this, but I have a problem with cookbooks.  Collecting  cookbooks, to be more precise.   There are some of you out there who may be afflicted with the same malady.  It used to be worse...much worse.  Dozens and dozens of them taking up space on the bookshelf.  I would buy them willy nilly because one recipe, maybe two, caught my attention.  They languished on those shelves, rarely being used.  Every once in a while I'd halfheartedly weed through the collection and put a couple in the Goodwill box, but invariably replace it with at least one more...and the cycle continued.

A couple of years ago, I was brutal in cleaning up the collection, keeping only those that I thought I would really use.  On occasion, I did come home with another cookbook, but I made sure that it would be a book that would be consulted over and over again.  Then the vintage collection began.  I can probably pinpoint that fateful moment to a weekend trip to Palm Springs about 5 years ago.  It was an old paperback from the 1950's in really poor condition, but I loved the graphics, and for less than a dollar, how could I leave it?  A year or so ago, I had the notion to make notecards with recipes from old cookbooks.  That justified the purchase of more cookbooks...more raw materials needed.  After I brought the books home, I realized that I loved looking through them...for the pictures, for the copy, for the sheer enjoyment of recipes that you don't see today.

Where it all began.

I starting wondering about how well those recipes would hold up today.  I was thinking about how great it would be to find a book of tried and true recipes.  Then it hit me...you know those cookbooks that are put out by churches, women's groups or schools for fundraising?  Spiral-bound, Times Courier font, no-frills books full of recipes handed down from grandmother to mother to daughter, passed from neighbor to neighbor with all the kinks worked out over the years.  So...guess what I did.  I bought myself a few.  A lovely little lot of five.  I've perused them over and over again since I received them last week.  I love seeing each recipe credited with its contributor.  I love seeing the occasional mention of 'oleo' in the ingredients list and the sage advice in the directions:  'Allow plenty of time for this.'  Know what?  I can see myself making a lot of the recipes in these books.  It took me no time to try the first one.  A recipe for bread that seemed so easy, I had to make it.  I was not disappointed in the outcome.  It was easy and delicious and no doubt will be in rotation regularly.

So...I want to say 'thank you' to the Dinwiddie County Junior Women's Club for gathering their winning recipes together, and especially to Ann H. Jarvis for her English Muffin Loaf.  This is fabulous right out of the oven, slathered with butter, but I actually think I liked it better the next day.  You can slice this really thin.  Think about it for a cocktail party...use it as you would cocktail rye bread.  I also topped it with a spread of cream cheese, feta, and roasted red pepper.  This is a keeper.

Next time you find yourself at a yard sale or flea market, don't turn your nose up at these books.  They may not have the splashy color photos or be written by the latest Food Network star, but I'll bet you'll use it over and over, because, well...they know.

English Muffin Loaf
Courtesy of Ann H. Jarvis
Makes two loaves

6 cups unsifted flour
2 pkg dry yeast
1 tbsp sugar
2 tsp salt
1/4 tsp baking soda
2 cups milk
1/2 cup water
corn meal

Combine 3 cups flour, undissolved yeast, sugar, salt and baking soda.  Heat milk and water until very warm (120-130 degrees).  Add to dry ingredients and beat well.  Stir in remaining 3 cups flour to make a stiff batter.  Spoon into two 8 1/2 x 4 1/2 x 2 1/2 inch loaf pans that have been greased and sprinkled with corn meal.  Sprinkle tops with corn meal.  Cover; let rise in a warm place, free from draft, 45 minutes.  Bake 25 minutes at 400 degrees.  Remove form pans; cool.  Slice and toast.  Freezes well.  

The Source

The Result

A Sampling of 'The Collection'


Thursday, September 6, 2012

Holding onto Summer

You know as well as I do that when Labor Day hits on the first Monday in September, there's a shift in the season.  Despite the fact that the first day of Autumn isn't until September 22, you invariably start packing up the vestiges of Summer.  If you have kids, they go back to school and you begin to pack up the fun.    The days feel less carefree and dusk begins to arrive a few minutes earlier every evening.

But look outside...the weather isn't giving up it's heat, humidity, or beating sun just yet. September can be notoriously hot.  So, while part of you may be thinking about apple pies, hot chocolate on a chilly fall evening, or a whiskey to warm you up on a rainy Saturday afternoon, there's another part of you that doesn't want to let go of the bright, cool tastes of Summer.

The past three weeks of 90+ degree weather here in Los Angeles has made me want to put as little effort as possible into cooking.  I've baked way less than I have in months, and I am happily still in an eating rut of sandwiches where the closest thing to cooked is toasted bread and salads multiple times a day is okay by me.  The fruit bowl on the dining table has been overflowing this Summer:  plums, peaches, nectarines, berries, and melons have abounded.  I've been perfectly content standing over the kitchen sink, biting into a ripe peach, trying to keep the juices away from my shirt.  I'll think about making something more substantial, and find myself grabbing a plum and calling it a meal.

I was able to pick up cantaloupe a few days ago for practically pennies.  I think they were three for a dollar.  Since I can't resist an excellent price, I bought them.  I can easily eat half a melon sprinkled with a little sea salt and be a happy camper, but with three melons in the fridge, I knew I'd have to do something else with them.  After making July's cucumber soup, sometime over the past month I came across a recipe on Pinterest for a chilled cantaloupe soup.

Obviously, it took a few days to get the motivation up to make it.  I cut up the cantaloupe a couple of days ago with every intention of making it within hours...but as I mentioned before...this heat.  It makes me lazy.  It makes me wish I could just lounge by the pool drinking sangria.  (I don't have a pool, but I did have sangria.)

Well...I finally made it.  It was worth the wait.

Cantaloupe Soup
(Adapted from a recipe on Food52.com)
Makes 4-5 cups

2 medium cantaloupe melons, cut up (about 6 cups)
1/4 cup almond milk
Juice of one lemon
Juice of one orange
Juice of one lime
1/4 teaspoon orange zest
1/4 teaspoon salt
2 tablespoons fresh basil, sliced
2 tablespoon jalapeno 
1/4 cup sour cream
1/4 cup crumbled feta cheese

In a blender, add half the cantaloupe and all ingredients except the sour cream and feta.  Blend until pureed and continually add the remaining cantaloupe.  Blend until  no chunks remain.  In a small bowl, mix feta and sour cream  until the consistency of cake frosting. 

Pour soup into bowls and top with a dollop of the feta cream.  You can also serve it as an appetizer in shot glasses (or any small glass).  


Thursday, August 16, 2012

You're At That Age...

Late next week marks the 2-month anniversary of being out of The Day Job.  I mentioned it previously here. I am still among the ranks of the unemployed.  I spend a lot of time indoors, on the computer.  With the weather being what it's been...hot...it's not necessarily bad, but I'm finding myself going a little stir crazy, sometimes a little down.

I've also noticed that I've put on a few pounds.  You'd think with all this free time, I'd keep a regular gym schedule.  You'd think.  I've gone here and there.  Three days one week, once another week, a couple of weeks not at all.  Then I noticed something.  [Men, cover your ears if you don't want to hear 'women's talk.']  I noticed where the weight was going.  Right to my stomach.  That's right...belly fat.  What you hear about on television commercials.  Ugh.  The jeans are getting a little snug.  I went to lunch with my ex-manager last week and was lamenting about the weight gain and where it was settling in.  She smiled and said, 'You're at that age...'  It wasn't meant to be mean.  She's been there, seen that, and accepted it.  I'm not ready to accept it.  Five years ago I stepped on the scale and was shocked at the number I saw.  [No, I'm not telling!]  I was incredibly uncomfortable in my body and seeing the number cemented the change I was going to make.  It's been a journey.  More successful than not.  I've lost 4 pant sizes.  Five on a good day.  I know I'm getting older, the metabolism changes, it takes more effort to lose weight and keep it off.  And, it's no secret...I love food.

The blog is indicative of how much I love food.  I have weaknesses.  You may know them.  Their names are Cheese, Potato Chips, and Bacon.  I hate the word 'diet'.  I haven't thought of myself as being on one for at least 20 years.  I believe in changing how you look at food, finding a balance, not denying yourself and if you go overboard one day, you rein yourself in the next.  I've been thinking about the hows, whats, whens, and whys of my eating habits over the past few days.  I'm wondering if I'm eating too much fruit and not enough vegetables (to balance out the sugar), not enough protein, too many carbs (I'm Italian, life must include bread and pasta!), or just too much late at night.  And let's not forget the vino.  I have a rule when I'm working, no drinking if I work the next day.  Well...that rule has been thrown out the window.  Not that I'm a tipsy baker or anything, but I've had more wine than usual (for me) over the past couple of months.

Where is this all headed?  I guess what I'm trying to say is...a tiny little light bulb when off above my head.  No screaming 150 watt bulb, but a mellow 25 watt.  A gentle reminder.  To take care of myself.  To get back on track.  To be more conscious of what I put in my mouth.  Do I regret making whole milk ricotta the other day?  No...especially when I paired it with figs and honey!  Will I limit myself to a realistic serving of potato chips?  Yes...those kettle chips are evil!  And I'm going to stop making excuses to skip the gym.  I can happily say that after I go this Saturday, I will have made it to the gym five days this week.  It's been a long time since I've done that.  I also have to push myself to do more...kick it up a notch...or six.  Take advantage of this time I have.  I still have a goal weight in mind.  And I'll be damned if I don't reach it.

Don't worry...the baking won't stop.  I have way too much fun with that.  I have way too much fun in the kitchen, period.  I'm still working on Semplice Gourmet, so experiment after experiment will be happening.  I just have to balance myself.  Again.

I've been thinking about coleslaw for a couple of weeks.  I bought a head of red cabbage last week and finally got around to bringing it to fruition today.  There is sweet, sour, vegetables, protein, and a few carbs here.  Keyword?  That's right...balance!  And it was so good.

Red Cabbage Slaw
(Makes a lot)

1 small head red cabbage, shredded
1 cup shredded carrots
1/4 cup red onion, minced
1 can garbanzo beans, drained and rinsed
1 large red bell pepper, minced

Honey Dijon Vinaigrette

3 tablespoons honey
1 tablespoon apricot jam
3 tablespoons red wine vinegar
1 teaspoon minced garlic
1 tablespoon whole grain Dijon mustard
1/4 cup olive oil
1/4 teaspoon pepper
pinch salt

In a large bowl, combine the cabbage, carrots, red onion, garbanzo beans, and bell pepper.  Stir to mix well.    In another bowl or a jar with a lid, add the honey, jam, vinegar, garlic, mustard, olive oil, pepper, and salt.  It's easy in a jar.  Secure the top and shake, shake, shake.  If you're making it in a bowl, whisk well until all the ingredients come together.  Feel free to adjust to your taste, whether more honey, mustard, or pepper.  Add to the bowl of vegetables and mix, mix, mix.  Let it sit for a few minutes before you eat or serve it so the flavors can mingle.  

Wheat tortilla, shredded grilled chicken, and slaw.  A sprinkle of sesame seeds.  Call it dinner.


Saturday, August 11, 2012

Midnight Baking Session No. 746

Truthfully, it was closer to 10:00 p.m. and baking was probably the last thing I should have been doing since I've no one to really share baked goods with these days and I certainly don't need to be eating a whole batch  of anything myself.  Thankfully, I have a neighbor upstairs that has stepped up and has very happily been playing the role of taste tester, so all is not lost.

It was nothing fancy that came out of the oven last night.  Just a pan of brownies.  Though these brownies did  have a few ingredients tweaked, because if I don't tweak every now and again, I wouldn't be me.  I opened the Italian Pantry the other day and almost had the bag of chestnut flour fall on my head.  Yes, the Italian Pantry is living up to its name, still well-stocked.  I took the falling bag of flour as a sign that I should do something with it.  While I think about making Castagnaccio, last night I wanted to make something not too far out of the ordinary.  I'm warming up to brownies.  They're kind of comforting in their chewy, chocolatey richness.

I really really like chestnut flour.  There's a smokey sweetness to it that I can't compare to anything else I've tasted.  It lends itself fabulously to the dark chocolate I used here.  I didn't use baking chocolate.  You know those huge 1lb+ bars they sell at Trader Joe's?  No?  Well, that's what went in these brownies.  It's a total bargain if you have a massive sweet tooth, are a chocoholic, or just want to make sure you've got chocolate around when it's late at night and you want to bake brownies.   I'm also thinking of the Chestnut Cherry cookies I made last Christmas and bet that cherries in those brownies would take it just that right step beyond.  Next time.

Chocolate Chestnut Brownies
(Adapted from a recipe in Martha Stewart's Cookies)
Makes 16 brownies

6 tbsp unsalted butter
6 ounces dark chocolate, roughly chopped
1/4 cup cocoa powder
3/4 cup chestnut flour
1/4 tsp baking powder
1/4 tsp coarse sea salt
1 cup sugar
2 large eggs
2 tsp vanilla

Preheat oven to 350 degrees.  Line an 8x8 inch baking dish with parchment and grease parchment with a small amount of butter.  In a small bowl, add the butter, chopped chocolate, and cocoa powder.  Place bowl over a saucepan of simmering water.  Stir frequently to melt the chocolate and butter.  When everything has melted, remove from heat and let it cool slightly.  In a another bowl, add the sugar, vanilla, and eggs.  Whisk until light and fluffy either by hand or with an electric mixer.  Mix the flour, salt, and baking powder together in a third bowl.  Add the chocolate mixture to the eggs and sugar, mixing well until combined.  Slowly add the flour, making sure to mix all the ingredients well.  

Pour batter into baking pan, spreading out to corners.  Bake until  cake tester inserted in center comes out fairly clean, about 30-35 minutes.  Let cool in pan for 15 minutes before removing from pan and letting brownies finish cooling on rack.  


Sunday, August 5, 2012

Not Too Sweet

In deciding what to put in the Etsy shop (which can be found here if you'd like to check it out), I really wanted a mix of sweet and savoury items.  I want it to encompass more than just baked goods.  I made Pan de Higo a few days ago, it's 'curing' as I write and should be ready in a day or two.  Hmmm...I should go out and get some cheese so I can taste test.  Oh, the lengths I go to!

Let's talk savoury.  I'm talking beyond crackers...this is about biscotti.  Being Italian, I think it's part of my genetic make-up that I love the twice-baked cookie in all its many wondrous variations.  There is nothing wrong in having a couple with an after dinner espresso or vin santo.  In fact, I encourage such behavior.  But there is also nothing wrong with having savory biscotti as part of your antipasto platter or cheese plate.

Keeping with (recent) tradition, living on antipasti for days on end, I wanted something a little more substantial than pita chips or crostini.  A biscotti recipe is a very forgiving thing.  I've said it many times, I love a recipe that can be adapted to more than just its original incarnation.  It is the test of a great basic recipe if you can make changes by adding or subtracting and have a winner more times than not.  Think of it this way, thousands of Italian nonne can't be wrong.  I slice them thinner than sweet biscotti, making them more user-friendly when you have it topped with a white bean garlic dip or my current favorite, Sweet Tomato Marmalade (compote, jam, what-have-you).

The two current winners are Parmesan-Fennel and Sundried Tomato-Cracked Pepper.  I'm going to give a Gorgonzola biscotti a try and perhaps basil or oregano.  If they pass muster with the secret taste-testers, they'll go in the 'Win' column.

Sundried Tomato-Cracked Pepper Biscotti
(Adapted from a recipe on Epicurious)
Makes one loaf--about 24-30 biscotti


2 cups flour
2 tsp freshly ground pepper
1 tsp salt
1 tsp baking powder
1/4 tsp garlic powder
2 eggs
6 tbsp butter, cold, cubed
1/2 cup milk
1/2 cup sundried tomatoes, chopped roughly


Preheat oven to 350 degrees.  Combine flour, pepper, baking powder, garlic powder, and salt in a bowl.  Cut in butter with a pastry cutter or two butter knives until mixture resembles large crumbs.  In a small bowl, whisk together the milk and eggs.  Add slowly to dry mixture, incorporating liquid into dry.  Gradually add sundried tomatoes and mix until well combined.


Turn dough out onto a floured board and form into a log shape, about 4 inches wide and 12-14 inches long. Place on baking sheet and bake for 30 minutes.  When initial baking time is up, remove from oven and let sit for 10 minutes.  Turn heat down to 300 degrees.  Transfer log to cutting board and cut into slices, about 1/2 inch wide.  Lay biscotti back onto baking sheet and bake again for 40-45 minutes, until crispy.  Turn biscotti over half-way through second baking time.  Cool on rack when finished.


Sweet Tomato Marmalade
(Makes roughly one cup)


1 1/2 dry pints of cherry or grape tomatoes
4  cloves garlic, minced (optional)
1/4 cup brown sugar, dark or light
1/3 cup honey
1-2 tbsp balsamic vinegar
2 tbsp olive oil
salt and pepper


Wash, dry, and halve tomatoes.  In a deep skillet, over medium heat, warm olive oil.  Add tomatoes and garlic.  Lower heat and saute for 8-10 until tomatoes start to break down.  Add honey, brown sugar, balsamic vinegar, salt and pepper.  Keep heat low and let tomatoes reduce.  Stir frequently.  Let cook for about 20 minutes, until juices are syrupy.


If this lasts longer than an hour or two (there's a good chance it won't), store in refrigerator, but bring to room temperature before eating. 


At the start

A jar full of goodness

Parmesan-Fennel Biscotti with Sweet Tomato Marmalade

Sundried Tomato-Cracked Pepper Biscotti


Thursday, July 19, 2012

Summer Fare

When the long, hot days of Summer hit, the last thing most of us want to do is spend time cooking.  Admittedly, I have found myself baking on 100 degree days, but for the most part, I'm right there with you and don't want to cook.  I live on sandwiches when the days are sweltering.  But you cannot live on sandwiches alone and sometimes you just want something a little more refined.

My first pick is soup.  I know, I know...here we are trying to stay cool and now I'm telling you to make something that you imagine as being piping hot and best enjoyed on a cold, rainy day.  But no, it's a chilled soup, cucumber soup.  I first came across this recipe in the June 2009 issue of Real Simple magazine and have made it at least once every Summer since.  It's quick to put together in a blender, you can make it in the morning before the temperatures start to soar and stash it in the fridge to chill all day.  Take the serving suggestions from Real Simple--baguette slices, feta, olives, and salami--and with the soup, you've got a satisfying meal.

My next choice requires a little more work and some time simmering on the stove, but the pay-off is fabulous.  Dolmades--stuffed grape leaves.  They take less effort than you think.  Have them as an appetizer or as a vegetarian main course with a salad and call it a day.  I've made dolmades a couple of times and I'm still perfecting my style.  I have yet to learn that less is more when it comes to filling them.  Quite a few literally burst out of their seams when they were cooking, but in the end, they tasted amazing.  One of the nice things about stuffed grape leaves is that you can eat them warm or chilled.

Cucumber Soup
(Adapted from the Chilled Cucumber Soup recipe at Real Simple)

3/4 cup sour cream
6 Persian cucumbers, peeled, chopped roughly
3 jalapeno peppers, seeded and chopped
1/4 cup chopped white onion
juice of one lime
2 tbsp basil
salt and pepper, to taste

Throw all the ingredients in the blender and puree.  Add a little water if you need to.  Season with salt and pepper.  Let chill for at least 2 hours.  

You can also crumble the feta on top of the soup with a dash of pepper.  That way you'll have the tang of the cheese with the subtlety of the soup.  


Dolmades
(Adapted from Modern Greek)

2 tbsp olive oil
1/2 medium onion, minced
3/4 cup brown rice
20 grape leaves
salt and pepper, to taste
1/4 cup labne or Greek yogurt
1 tsp oregano

Heat the oil in a skillet over medium heat, add the onion and saute about 5 minutes until they start to soften.  Add brown rice and saute an additional 5 minutes to toast.  Season with salt and pepper.  Remove from heat and let cool for a few minutes.  

If you're using grape leaves packed in brine, rinse well.  If using fresh, blanch for a few seconds in boiling water and pat dry.  Lay leaves vein side up and add about a tablespoon of the rice mixture to the center of the leaf.  Fold sides to the center, then fold up from the bottom and roll until you've reached the top end.  Place seam side down in a skillet, packing the stuffed leaves in a tight circle as you go.  Add enough water to cover the leaves, place a plate on top to hold down the dolmades and simmer for 35-40 minutes.  

Blend labne or yogurt with oregano and spoon over dolmades.  Serve warm or cold.  I think they are better when cool, as it gives them time to set.  


Sunday, July 15, 2012

A Bowl of Cherries

One of the reasons I like Summer is seeing the first crop of cherries coming into the market.  So far, I think I've gone through three or four pounds of them.  I can easily sit at the table and eat one after the other.  I've made my Cherry-Amaretto Syrup, now my favorite topping for French toast, and Cherry Almond Shortbread a couple of weeks ago for Girls' Night.  Yes, I see the pattern...I do love the tastes of cherries and almonds together.

The thought that I couldn't get out of my head was making a cherry clafoutis.  Part of the attraction was it being something that I hadn't made before and well, it was a little exotic.  I was originally under the impression that it was closer to a cake in consistency, but when I started to seek out recipes I saw the comparisons to flan.  Having not been a huge custard fan in the past, I decided it was time to change that.  You know, my egg issues.  I narrowed the choices down to three recipes (Saveur, Epicurious, and Simply Recipes).  I ended up going with the Saveur recipe, incidentally, the one that uses the most eggs.

You'll read that typically clafoutis uses unpitted cherries, so the batter can get a hint of the almond-like flavoring that the pits will release while baking, but I opted for pitting the cherries (by hand, just me and a knife, and some still very stained fingers).  Other than the time it takes to pit the cherries, this will easily come together.  I did it by hand and recommend it if you don't feel like dragging out the mixer.

It's amazing warm, dusted with confectioners sugar, just long enough out of the oven so the batter can set a little bit and nearly as good at room temperature.  Don't make me admit that it was a late lunch yesterday.  (And totally worth it!)

Cherry Clafoutis
(Adapted from a recipe at Saveur)


1 tbsp butter
1 tbsp vanilla extract
6 eggs
6 tbsp sugar
1 1/4 cups milk
2 tbsp bourbon
3/4 cup flour
3 cups cherries, pitted
pinch of salt
confectioners sugar (for dusting)


Preheat oven to 425 degrees.  Grease baking pan, pie plate, or skillet generously.  In a large bowl, whisk together the vanilla extract, bourbon, eggs, sugar, milk, and salt.  Add flour gradually until batter comes together.  


Pour batter into baking dish and scatter cherries in the batter.  Bake for 30-40 minutes  until edges and bottom are golden brown or until a toothpick inserted in center comes out clean.  The clafoutis will puff a little while baking and deflate a little once you remove it from the oven.  


Let cool a few minutes before serving.  Dust with confectioners sugar.  


Tuesday, July 10, 2012

Another Step Forward...

...because sometimes I think I excel at taking steps back...not today...no, siree...

...don't even ask me how nervous I've been all day getting this together, though it's been going on for close to a month, I made today THE day...a weird (or not) mix of nervousness,  a little anxiety, and excitement...it kept building with each step I completed....and with a wee bit of hesitation, my finger hovered over the 'Launch' button...

...but here she is...is all her infant glory...months ago I told myself, "Onwards and upwards because there is no other way to go."  See...I really am trying to be more positive...

...humour me...PLEASE!...and check out the shop...  :)

Semplice Gourmet


Thursday, July 5, 2012

The Bounty

Between reading other blogs and hearing from friends, the typical Summer bounty of zucchini a-plenty seems to be starting.  I, on the other hand, actually have to buy it at the grocery store.  The upside?  Zucchini is pretty inexpensive.  Mind you, if there is anyone out there who lives nearby and you have an abundance of zucchini on your hands, don't hesitate to give me a call.  I would be happy to take it off your hands.

Usually I'll make zucchini-walnut cake, but this time around I wanted to throw in some chocolate.  I've seen recipes for zucchini-chocolate cake before and I figured it was time to give it a go myself.  I found an excellent recipe for Zucchini Muffins on the Simply Recipes blog/site.  As I've mentioned before, I love a recipe where you can easily swap out ingredients to suit your taste.  This one did not let me down.

Consider it...once you've had grilled zucchini, zucchini fritters, zucchini chips, and zucchini quesadillas you'll still want these muffins.  Honestly, they have chocolate in them...how could you not?

Zucchini-Chocolate Chip Muffins
(Adapted from the Zucchini Muffins Recipe on Simply Recipes.com)
Makes 6 [actually, 7...but it was half-sized]


1 1/2 cups grated zucchini
1/3 cup melted unsalted butter
1/2 cup sugar
1 egg
1 teaspoon vanilla
1 teaspoon baking soda
1 1/2 cups flour
1 teaspoon cinnamon
1/4 teaspoon nutmeg
1/2 cup semi-sweet chocolate chips
Pinch of salt


Pre-heat oven to 350 degrees.  Line muffin pan with liners or grease with a little butter.  Melt butter and set aside.  In a large bowl, combine sugar, egg, and vanilla.  Mix well.  Add grated zucchini and butter.  Stir to combine.  In a small bowl, add flour, baking soda, cinnamon, salt, and nutmeg.  Mix dry ingredients then add gradually to wet ingredients.  Add chocolate chips and stir until all the ingredients are combined.  Spoon into muffin pan, so each well is nearly full.  Bake for 25-30 minutes until tops are golden and a toothpick inserted in center comes out clean.  Let cool for 5 minutes in pan before removing and finish cooling on cooling rack.  

My baking time was closer to the 30 minute mark.