Pages

Showing posts with label dessert. Show all posts

Monday, February 23, 2015

Wait! Stop What You're Doing!

Maybe you're a lot like me and think brownies are only ho-hum, not too special, you know...brownies.  Then you find yourself invited to an Oscars viewing party and you want to bring something.  You have no idea what you're going to make, other than something dessert-ish.  Then you're reading through your blogs feed and come across the latest post from Luisa Weiss, aka The Wednesday Chef.  She's writing about something called Boston Brownies from a German baker named Gerhard Jenne.  Brownies with cranberries in them.  Cranberries.  You think of your deep love of cranberries and think how right it is to combine the two.  And she's raving about them.  Raving...over brownies.  And there you have it.  You know what you're taking to that Oscars viewing party.

But that's not quite all of it.  You decide to use the Special Dark cocoa.  After the brownies are baked, still warm, fresh out of the pan, onto the cutting board where you're cutting them into their little squares, getting them ready for their party debut, you have to try a little piece to make sure they've turned out okay.  You bite into it.  You get a burst of cranberry as your teeth sink into the deep, dark chocolate.  And you find yourself holding onto the edge of the counter and saying to yourself...oh, fuuuuuddddggggeeee... (But it's not really 'fudge' that you're saying.)  It's that kind of brownie.  And you think to yourself....'Why don't I make brownies more often?'


Dark Chocolate Brownies with Cranberries
Adapted from The Wednesday Chef's adaptation of Gerhard Jenne's recipe
Makes One 8x8 inch pan (about 16-20 brownies)

3 eggs
175 grams sugar (1 1/3 cups)
175 grams butter (6 1/4 oz)
150 grams chocolate, preferably dark, mine was 64% (5 1/3 oz)
175 grams flour (1 1/3 cups plus 1 tbsp)
4 tbsp cocoa powder, preferably Hershey's Special Dark
1 tsp espresso powder
1/4 tsp salt
175 grams cranberries (6 1/4 oz)

Preheat oven to 350 degrees and line an 8x8 inch pan with parchment paper.  Chop the chocolate into small pieces.  In a small bowl, add flour, cocoa powder, espresso powder, and salt.  Whisk and set aside.  In a large bowl, whisk eggs and add sugar, whisking until combined and frothy.  In a saucepan over medium heat, melt butter, then turn off heat and add chocolate, stirring until chocolate melts.  Add chocolate mixture to eggs and sugar, whisking until combined.  Gradually add the dry ingredients, mixing until just combined.  Add cranberries and stir into batter.  Pour batter into pan and bake for 25-40 minutes, until toothpick inserted comes out mostly clean.  Allow to cool for 10 minutes before removing from pan.  Cut and serve.

Notes:  I followed Luisa's example and weighed the ingredients this time around.  I have a little kitchen scale that I got for $5.00.  It does the trick.  Regular cocoa will work just fine in this recipe, but I urge you to seek out the Special Dark.  It takes the fudginess to a whole other level and when you get a bite of the dark cake and tart cranberry, it is just magic.  Seriously.  You can use frozen cranberries, but the batter will seize as you're mixing the fruit in.  Luisa does mention this, also noting to work quickly, but I don't think I worked quickly enough, so a good 60-70% of my batter was a big seized lump.  But...I figured it would melt as it warmed in the oven, so I didn't worry too much.  Saying that, while Luisa says to bake for 25 minutes, mine baked for 40 minutes, maybe a little more (I also forgot to set a timer).  I'd bet the longer length of time is because for the first 20 or so minutes, I was obsessively opening the oven and spreading the batter over the pan as it gradually warmed.  So...my advice?  Thaw your berries and make sure they're room temperature.  Unless you want to deal with seized batter.


It's like this...really...


Tuesday, July 29, 2014

Taking A Cue

One blog that I read on a regular basis is David Lebovitz's blog.  You cannot go wrong with someone who has written numerous books on the subject of dessert and worked with Alice Waters.  It was his recent post on cherry compote that caught my attention, especially when he began the post claiming to have an affliction with buying too much Summer fruit when in season.  Mentally, my hand went up, guiltily, when I read that sentence, looking over the computer screen to the bowl of fruit on the table that was (and is) overflowing with plums (three varieties), nectarines, and peaches.  And let's not forget how I feel about cherries.  I get excited when cherry season arrives.  I always buy large amounts with big plans on making something truly special with them.  But then...I find myself standing at the kitchen counter, my hand repeatedly dipping into the bowl and eating one after another, after another...after another.  More times than not, I find myself with a pile of cherry pits, stained fingers, and nothing made from those glorious ruby orbs.

This Summer was looking like there would be no cherry-centric recipes made as I was on my third bowl of cherries and I still hadn't made it past the eating stage.  Then, I came across David's recipe.  Looking at the photos he posted, all I could imagine was spooning cherry compote over vanilla ice cream.  Let me tell you...since I caught strep throat last month, ice cream has been a consistent resident in my freezer.  You know...it soothed the pain of an awful sore throat.  Well...then it did.  Now, it just makes me happy.

Get out your cherry pitter (or chopstick), pit some cherries, and make this.  Be sure the vanilla ice cream is in the freezer and ready for it.

Cherry Compote
Adapted from a recipe by David Lebovitz
Makes a little over a cup

2 cups cherries, pitted
1/4 cup pure cane sugar
2 capfuls Irish whiskey (optional)
1/4 teaspoon almond extract

Pit the cherries and add to a large saucepan.  Make sure any juice from the cherries winds up in the pan too.  Add the sugar, extract, and whiskey.  Over medium heat, cook all the ingredients, until the cherries begin to break down.  Occasionally check the progress, since the cooking will cause the cherries and liquid to foam.  Since this isn't a large amount of cherries, it shouldn't be a problem if your pan is large enough.  Cook until the fruit breaks down a considerable amount and all the flavors have mingled (about 20-25 minutes).  Allow to cool for a few minutes before storing or topping ice cream.  

Notes:  I used a chopstick to pit the cherries.  It takes a little getting used to, but once you find a rhythm, it gets easier.  It's a little messy, but worth it.  Be sure to catch any juice from the cherries (there will be some).  I literally used 2 capfuls of whiskey, so if you're looking for an exact measurement, I'll guess it's close to two tablespoons.  Amaretto is another option to use, giving you a double punch of almond if you also use the almond extract, though you could substitute vanilla extract if amaretto is used. 


Sunday, March 24, 2013

With Subtle Notes of Blackberries

If you read about wine, go to tastings, collect wines, or hell, even buy wine, chances are you've seen phrases like this--'with the subtle note of blackberries', 'starting off with tropical notes ending with vanilla tones', 'hits the palate with a citrus wave ending with a buttery mouthfeel'.  Now, I love wine...but try as I might, more times than not, wine will invariably taste like...well, wine.  I can tell the difference between a good and bad wine (no Mad Dog here!) and absolutely appreciate a Justin cab or a Stony Hill chardonnay, but I could probably count on one hand the times where I have actually been able to discern individual notes in a glass of wine, but that won't stop me...I'll keep drinking away.

It was those wine liner notes that came to mind after baking the other day.  Although it was those 'subtle notes of blackberries' that I was after, this post has nothing to do with wine.  What this post does have is chocolate.  And blackberries.  And brownies.  All rolled into one gloriously dense, gooey, fudgy pan of cake with a slightly caramelized, thick swirl of jam throughout.

My sweet tooth, really my chocolate tooth, has been out of control lately.  I'm going to blame it on the Cacao Noel pastilles I bought at the Epicure Imports warehouse sale last month.  A small handful of their 64% dark couverture chocolate and a cup of tea has been dessert on a number of nights since I brought them into the house.  After a sample tasting at the sale, it was a no-brainer to buy a pound of them.  (It was also another no-brainer to pick up a second bag at the sale yesterday.)  I immediately wanted to make brownies with them.  Smooth, dark, and a touch bitter.

Why did I add blackberries?  Sure, I could  have just saved them for a breakfast smoothie, or added them to a bowl of yogurt and granola, but, why not brownies?  If you can pair dark chocolate with orange and raspberries...my thought was that it certainly couldn't hurt to try pairing chocolate with blackberries.

I had a clamshell of blackberries in the fridge and made a quick jam out of it.  You can do the same or use any good brand of jam that you may have on hand.  What you'll end up with is a dense brownie where every once in a while you'll get a hint of berry or a jammy taste depending upon how your swirls are mixed in.  I'm sure there are some of you out there saying 'Blasphemy!' for mixing anything into brownies (except maybe nuts and a glaze on top), but open your mind and your tastebuds for a few minutes.  You might be delightfully surprised.

Chocolate Blackberry Brownies
(Adapted from Dorie Greenspan's Classic Brownies)
Makes 16 squares

5 tbsp butter, cubed
4 oz bittersweet chocolate, chopped
1/4 cup semi-sweet chocolate chips
3/4 cup sugar
1/2-3/4 cup blackberry jam
2 large eggs
1 tsp vanilla
1/4 tsp salt
2/3 cup flour


Pre-heat oven to 325 degrees.  Butter the bottom of an 8x8 inch pan and line with parchment.  Butter the top of the paper too.  


In a saucepan, bring about an inch or so of water to a simmer.  Nestle the bowl with the butter, chocolate, and chocolate chips on top of the pan.  Making sure that the bottom of the bowl does not come in contact with the water, continually stir the butter and chocolate until melted.  Remove from heat.

Whisk in sugar.  It will be grainy.  Add eggs one at a time and mix thoroughly.  Add vanilla and stir.  Gradually add flour and salt.  Pour into pan, using a spatula to spread batter to edges.  Spread blackberry jam on top of batter and swirl into batter.  

Bake until toothpick inserted into center comes out relatively clean, about 40-50 minutes.  It's okay if it comes out with a little chocolate, but you don't want it wet with batter.  If you use more jam, you'll require a little more time.

Let cool on rack and cut into squares.

Note:  If you make your own quick jam, use one package of blackberries (4-6 oz) with 1/2 cup water and 1/2 cup sugar.  Bring to boil, lower heat and let simmer until it thickens a bit.  I used a potato masher to mash the berries.  


Tuesday, October 9, 2012

A Little Celebration


We celebrate birthdays, getting an A on a final, graduations, new jobs, and new relationships.  We will seek out reasons to celebrate because it makes us feel good.  A little acknowledgement, a little validation, a little joy.

There are a couple of accomplishments to celebrate here.  No, I can't tell you that I have a new job yet.  Hopefully soon.  But what I can tell you is that this post is Number 100.  That's right.  The big One-Oh-Oh.  I know, I know...I could have reached the marker a little sooner if I posted more often, but you know what they say...good things come to those who wait.  And I've got a lot of patience.

Another accomplishment from the past two weeks was writing the recipes for the weekly newsletter of FarmBoxLA.  FarmBoxLA has built relationships with a couple dozen farms in the area and will source seasonal fruits and vegetables from them on a weekly basis, which will then be delivered to you at the beginning of each week.  I heard from them about three weeks after I responded to an ad they placed looking for food writers.  A few emails and a couple of phone calls later, I met Reisha at the Santa Monica Farmers Market and we did a little shopping.  I came home with a bag of goodies and a five recipes goal.  Those recipes were featured in the September 30 Newsletter or via the 'Our Kitchen' link on their site.  I had a lot of fun writing for them and hope I will again.

So, I waited to write post one hundred because I was busy for a couple of days with the FarmBoxLA assignment, but also because I wanted to make something special.  Sure...I could have baked another cake.   But why bake a cake when you can make struffoli?  Don't know what struffoli are?  Let me tell you.  Other than being my favourite dessert ever, this Italian treat is little bits of dough that are fried and then coated in a honey syrup.  Struffoli is usually made around Christmas and my strongest memory of them is my Aunt Placida bringing over a huge platter of struffoli a couple of days after Christmas in 1979 after I had come home from the hospital after an overnight stay.

Proust had his madeleine, I had my struffoli.  Despite having struffoli once or twice since that day in 1979, the first bite I took after making them transported me back to my parents' kitchen, sitting at the table and biting into a crunchy bit of dough and candy sprinkles, my fingers sticky with honey.

It was the perfect way to celebrate being home from the hospital, hanging out with my family, and now...celebrating one hundred.

Struffoli
(From The Italian Cookbook by the Culinary Arts Institute)

2 cups sifted flour
1/4 tsp salt
3 eggs
1/2 tsp vanilla extract
1 cup honey
1 tbsp sugar
1/2 tsp cinnamon
1 tbsp candy sprinkles
oil for frying (I used sunflower)

In a skillet over low heat, mix the honey, sugar, and cinnamon.  Stir and let the sugar dissolve.  Once warm and all ingredients are combined, turn off heat and set aside.

In a large bowl, add the flour and salt.  Making a well in the center of the flour, add eggs, one at a time, loosely mixing with a fork after each addition.  Add the vanilla with the last egg.  

After mixing well to form a soft dough, turn onto a floured board, knead for 5 minutes and divide dough in half.  Roll each half until about 1/4 inch thick.  Slice into narrow strips, then cut strips into little pieces about 1/2 to 3/4 inch long.  You can also roll the strips before cutting them to get little tubes or spheres.  

In a saucepan, add the oil and heat.  When the oil is hot enough, add only enough dough pieces so you're not crowding the pan.  Let fry until lightly golden brown.  Remove with a slotted spoon and place onto a papertowel-lined plate to drain any excess oil.  

Once you've fried all the dough, add to the honey mixture and mix thoroughly so each piece is coated with the honey syrup.  Spoon onto platter and add sprinkles.


Tuesday, June 5, 2012

Panna Cotta

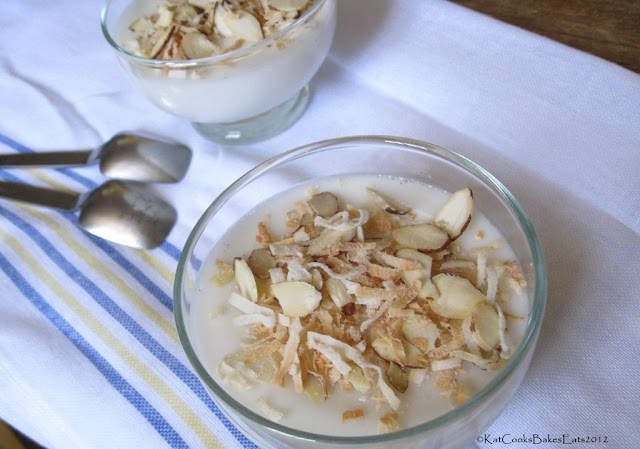
Just two Italian words that when spoken, will make you think of sitting at a little trattoria in Rome, sipping an espresso and watching the people around you.  Meaning 'cooked cream,' panna cotta struck me as exotic and difficult to make.  Then I read a recipe and realised that I was wrong.  It's a relatively easy process.  I did a little Googling to see if I could make it with coconut milk.  Lo and behold...you bet you can!

Panna cotta falls into the category of a 'pretty' dessert:  the contrast of white creaminess with whatever you choose to top it with.  I didn't want to compete with the coconut and simply topped it with toasted coconut flakes and slivered almonds.  I used a recipe from the Inspiring the Everyday blog, where Michael's photography makes the dessert look amazing and delectable.  Like Michael, I didn't add any additional flavour, so the panna cotta is very subtle.  Next time I make it with coconut milk, I plan on punching up the flavour a little bit.

Find the recipe on 'Inspiring the Everyday' here.


Wednesday, May 23, 2012

Simplicity


Chocolate and vanilla....where some may see boredom, I see simplicity.  Ask me what my favourite ice cream flavour is, and despite having tried flavours as varied as mango, pomegranate, maple bacon, and Cabernet, I will usually vacillate between chocolate or vanilla.


So when asked by a friend to make mini-cupcakes for a baby shower, vanilla and chocolate was the plan.  A double-barrel shotgun of simplicity.  Singular flavours of vanilla with vanilla buttercream, and chocolate with chocolate buttercream were anything but.  Not all cake recipes are equal, I discovered.  I was like Goldilocks finding the one that was 'just right.'  Over the span of a week, out from the oven came four cakes, two winning recipes, and the end-result of a few dozen  mini-cupcakes.


The winning chocolate cake will be re-visited often.  Not too fudgy and not too sweet, you can enjoy it with a thick layer of buttercream or dusted with confectioners' sugar.


Texas Sheet Cake
Makes 20 to 24 servings
(From Bonny Wolf's 'Talking with My Mouth Full:  Crab Cakes, Bundt Cakes, and Other Kitchen Stories')  


1 cup butter
1 cup water
1/4 cup cocoa
2 cups flour
2 cups sugar
1/8 teaspoon salt
1 teaspoon baking soda
1/2 cup sour cream
2 large eggs
1 teaspoon vanilla
1 cups chopped pecans (optional)


Pre-heat the oven to 375 degrees. Butter or line with parchment a 15.5 x 10.5 jelly roll pan.  Combine the butter, water, and cocoa in a saucepan.  Heat to boiling, stirring occasionally.  


In a bowl, combine the flour, sugar, salt, and baking soda.  Remove the butter from the heat and add to the dry ingredients.  Mix well (either by hand or with a mixer).  Add the sour cream, eggs, and vanilla.  Mix again.  Pour into the pan and bake for 20 minutes or until a toothpick inserted into the cake comes out clean.


Note:  I halved the recipe and ended up with close to 4 dozen mini-cupcakes.  It will also make an 8 x 8 inch cake.  


Saturday, March 24, 2012

Fifteen Layers High

There's this little website called Pinterest that I am mildly obsessed with, meaning I don't have to visit the site every day, but more times than not, I will.  Pinterest is a virtual bulletin board.  It's a genius idea because I'm always bookmarking sites, whether they be recipes, blogs, photos, articles, or what have you.  In the past I've lost a huge amount of those bookmarks when I've upgraded browsers.  Now in one spot, off my hard drive, all my books marks can be saved!  Categorised!  It also satifies the voyeur in me because you share your boards with other people and can look at their boards!  It can be a huge source of inspiration.  If you're curious want to check out Pinterest or my boards, find me here.

To prove how inspiration struck, I found a pin for a crêpe cake.  That's right, a cake made with crêpes.  I love crêpes.  They're easy, they can be made sweet or savoury, and you can fill them pretty much with whatever you like.  I've had a great book on crêpes that I've referred to a number of times over the years.  Called (what else?!) 'Crêpes:  Sweet and Savory Recipes for the Home Cook,' it gives so many options you'll have loads of ideas for weeks.  The recipe for basic crêpes is so easy, along with all the variations they include.  But back to the cake.  Layer upon layer of buttery batter goodness.  This is not something to eat if you're trying to lose a couple of pounds this week.  If you're ready to indulge, I highly suggest it.  You don't need a crêpe pan or griddle (though it would be easier).  I use my 10-inch skillet, and while it does take a little maneuvering to slip the spatula under the edge to flip them, you'll find a rhythm that works for you with practice.

Make this if you're having friends over for dinner.  It's so pretty when you slice it.  I layered the crêpes with a mixed berry purée.  Next time (because there will be a next time), I'm going the chocolate or nutella route.

Sweet Crêpes
(Adapted from the 'Dessert Crêpes' recipe from 'Crêpes' by Lou Seibert Pappas) 
makes 14-16 10-inch crêpes


2 eggs
1 cup milk
1/3 cup water
1 cup all-purpose flour
2 tablespoons sugar
1 teaspoon vanilla extract
1 tablespoon Faretti biscotti liqueur (brandy, amaretto, bourbon, etc) [optional]
2 tablespoons butter, melted (plus more for coating the pan)


In a small bowl, sift the flour and sugar, set aside.  In a larger bowl, whisk the eggs, then add milk, water, vanilla extract, liqueur, and melted butter.  When all the liquid ingredients are combined, gradually add the flour and mix until incorporated.  Refrigerate the batter for at least an hour before use.  If the batter separates when chilling, mix again before making crêpes.


Heat a 10-inch skillet over medium-high heat, and coat the pan with a thin layer of butter.  Pour slightly less than 1/4 cup of batter into the hot skillet.  Thin is key here!  Cook until the edges start to curl and brown, about a minute.  Flip and cook other side until lightly browned.  Lay on plate to cool.  Layer wax paper or parchment between crêpes.


Mixed Berry Purée


1/2 cup strawberries, sliced
1/2 cup blueberries
1/2 cup raspberries
1/2 cup blackberries
1/2 cup sugar


In a blender, combine berries and sugar and purée.  Add water by the tablespoon if needed.  Adjust sugar to taste.  Blend until smooth.


To build cake:


Lay crêpe on plate and spread a thin layer of berry purée on top.  Repeat until all the crêpes have been used.  Sift confectioners sugar on top.


Wednesday, February 16, 2011

Sweets for the Sweet...

...in a post-Valentine's Day chocolate haze, I find myself obsessed with something entirely different...well, maybe not entirely, as it is sweet...certainly satiating a sweet tooth...full of crystal sugar goodness...

...let me introduce you to...Candied Orange Peel...a touch better...Blood Orange Candied Orange Peel...and after this morning, please meet her sister, Clementine Candied Orange Peel...


Blood Orange Candied Peel

Clementine Candied Peel
I love when blood oranges are in season....I can't get enough of that deep red flesh...the rosy blush of its skin...its juicy sweetness...


I used a couple of them to make a pomegranate-blood orange reduction for dinner and didn't want to waste a bit if I could help it...so I thought about what to do, google'd a recipe for candied peel and went for it.  I love how easy it is...so little work for a treat that is just short of amazing.  Yesterday while roaming a few food blogs I discovered Orangette's site and in reading her 'About Me' section, learned that the French call candied orange peel dipped in chocolate 'orangette'...no...I have not dipped them in chocolate...yet...at the rate I'm going, I will on the next go 'round...here's Giada's recipe (which does dip them in chocolate)...

Blood Orange Simple Syrup
...oh, I almost forgot to mention another by-product of making it...the orange-infused simple syrup that's produced...I dubbed it 'liquid gold' because it just is...still thinking about what I'm going to use it for...the bottle of bourbon is looking like a possibility...orange-almond cake (with thinly sliced peel atop) might make the cut...we'll see...with a weekend's worth of time on my hands in a couple of days, you never know what will come out of the kitchen...

...and check out the Orangette blog if you get a moment...it's charming and beautifully done....it also has me considering Aperol (but that's another story)...